|
|
Post by Aurora on Oct 22, 2018 7:52:18 GMT -5
As one shipment of parts has arrived, and another parcel is on the way (shout out to Pendles Slot Racing for excellent service), it's time to start building the 1938 ERA E-Type GP1. Each era of Grand Prix cars presents its own challenges. For 1960's cars, I really struggle with the packaging at the rear of the car, the motor/exhaust detail, and the suspension. For pre-war cars, it's the packaging at the front of the car that is the problem. Although perhaps not as difficult as the '60's and '70's cars, the suspension is still a challenge. The drum brakes look especially tricky - not sure yet how to model those. But the biggest challenge is those ubiquitous louvers, a problem that other builders here also encounter. Here is some experimentation with punching louvers into aluminum sheet. The aluminum is from a soda pop can. The punch is a screwdriver filed to shape. Two methods so far - punch and die, and punch on a flat rubber surface. Punch and die on the left. A die pattern is cut into the blue pvc pipe. The sheet is placed over the die and the aluminum is pressed into the die. On the right side is a rubber block. The sheet is placed on the surface and the punch is pressed onto the surface, depressing the louver into the rubber. Results are not yet satisfactory. The size and depth of the die is critical and I don't have it correct yet. I can't obtain consistent shape or size. The rubber block gives better results at present, but it isn't perfect. Next experiment I'll use a drill press to control depth and pressure. Matt |
|
|
|
Post by David Mitcham on Oct 22, 2018 13:26:43 GMT -5
Hi Matt
Your approach is a bit similar to what I tried using cable ties and rubbing over thin copper tape on top of them. It sort of worked but your more controlled method is likely to produce much better results.
Best Regards
David
|
|
|
|
Post by EM on Oct 22, 2018 15:31:30 GMT -5
Started me thinking (always dangerous) - I wonder if a knurling wheel like this one:
www.travers.com/high-speed-steel-knurl/p/30-931-220/
could be fitted to a handle and used to roll an appropriate pattern into thin sheet metal. They are available in a wide range of widths, diameters and "pitch"
EM
|
|
|
|
Post by Aurora on Oct 22, 2018 23:37:36 GMT -5
Thinking out loud is good thing, thanks for the feedback. It helps to hear these varied approaches to the problem.
The repeatibility and obtaining consistency are problems at the moment with my single punch. The zip tie method and the knurling wheel method both solve that problem. I'm hoping to be able to scribe a pattern of regularly spaced registration marks on the aluminum that will improve consistency.
Distortion is also a problem. The first punched louver in a row looks pretty good. But each successive louver distorts the preceding louver.
Releasing the tool from the aluminum after it has punched through is also inconsistent. Cutting fluid helps. An improved profile of the tip of the punch would help, but I'm already at my limit of my ability to file the optimum tool form.
|
|
|
|
Post by maxrossmassler on Oct 23, 2018 17:05:07 GMT -5
Maybe louvers could be rolled in with a 64- or 72- pitch spur gear?
|
|
|
|
Post by maxrossmassler on Oct 23, 2018 17:08:40 GMT -5
|
|
|
|
Post by EM on Oct 24, 2018 9:05:55 GMT -5
An interesting find although it took me a few moments to understand the "pitch distance" spec - not the clearest of draughting.
Might serve as a die for pressing the pattern into thin sheet metal but there might also be an alternative: Could one use a rack as a vacuum forming pattern, draw thin plastic and then cut off the sides and use the inward-facing and presumably sharper surface as louvres?
EM
|
|
|
|
Post by Aurora on Oct 24, 2018 10:35:39 GMT -5
The latest louver punch results were not good. A whole bunch of challenges. The aluminum sheet is 0.1mm thick. The louvers are 3.4mm long, 0.34 deep, and spaced 1.0mm apart. I can lay out the pattern on the sheet, but it is pushing my ability. The dimensions are almost too small to do this by hand.  The punch is held in a drill press chuck and pressed into the material. The first louver is well formed, but each successive punching operation creates a stress riser in the previous louver, which then cracks - consistently - in the middle. Not the kind of consistency I was hoping to achieve.  There seems to be a number of technical obstacles to overcome.  Annealing the aluminum is the next experiment. Perhaps another material would be better? Brass sheet, or plastic. The die is a big problem. The action of punching each successive louver distorts the preceding louver. This occurs for several reasons, but the main cause is the absence of a relief pocket for each louver that has already been formed. The form factor of the die isn't correct. The precision gear rack looks like a possible solution. I think I did look into one of these at one time, and they were not offered at hobby friendly price$, something on the order of $900 or so. [Edit: My memory gets worse every day. I was off on the price by a factor of 10 - racks can be obtained for around $90 USD] Perhaps I can cut one out of a piece of brass. Just getting in close enough to see and manipulate the tools and work pieces is one of those frustrating exercises that you can only laugh about. If I get in close enough to see what I'm doing, I block my light source. If I move the light source, I can't see what I'm doing. Each time I move the work piece, I try to place it correctly within a tenth of a millimeter. Hah, good luck with that! This cost of this experiment was a 30 cent can of cola. But what I really need is a microscope, a compound slide table, a CNC'd precision rack gear die, annealed aircraft quality aluminum, a customized carbide punch, and a CNC tool path.  Matt |
|
|
|
Post by chrisguyw on Oct 24, 2018 11:06:45 GMT -5
Hello Matt, I was just scouring the net looking for "miniature louvers " and came across the following. Made by shapeways. it is a 6mm louver tool........less than $30 (Canadian)......maybe worth investigating ?? Google "Shapeways 6mm louver set" and you will see the attached pics., with a link to shapeways........sorry I did not copy the link. Cheers Chris Walker   |
|
|
|
Post by Aurora on Oct 24, 2018 11:35:38 GMT -5
Chris, now there's a tool! Thanks for the heads up. That gives me some ideas for a form factor for the punch and die.
As one of my several failed experiments, I tried to grind a punch with that same flat shape. But my punch doesn't have a pedestal around the cutting head. And I didn't use a die. I can't figure out how to cut that die.
Matt
|
|
|
|
Post by Aurora on Oct 26, 2018 9:41:59 GMT -5
Another attempt at adding louvers to the engine cover. Several differences from previous attempts. The aluminum sheet was not pre-curved. It is mounted flat in a fixed position onto a flat wood surface. The workpiece does not move, only the tool moves.  Steel guides were placed along both sides of the tool path to help maintain registration of the tool bit. Instead of pressing the tool into the aluminum, the tool was struck with a hammer. A die was not used. The louver is hammered directly onto the surface of the wood. The wood reduced the distortion. Unlike the rubber block which rebounds completely, thus not providing any relief, the wood is imparted with a permanent impression which provides relief for each louver. 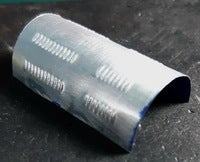 The louvers are embossed, instead of cut completely through the material. If I struck the hammer hard enough to cut through the material, the distortion increased to an unacceptable level. So I decided to emboss instead. Not quite as realistic, but better than broken louvers, or no louvers at all.  Still a lot more louvers to go...ugh! I think I'm going to stick with this method. Otherwise I'll be chasing my tail non stop. Matt Attachments:

|
|
|
|
Post by Aurora on Nov 4, 2018 9:28:26 GMT -5
Time to start creating the bodywork for this car. The shell will be built up from styrene sheet. And in a moment comparable to finding a gold nugget, today I found a piece of discarded PVC plumbing pipe laying underneath the elevated tollway near my house! So this car, like all my scratch built cars, will contain bits of recycled garbage. It pays to dig around in the dirt. And be easily entertained. It's the simple things in life...  There's a car in there somewhere  |
|
|
|
Post by Peter Seager-Thomas on Nov 4, 2018 11:33:58 GMT -5
All good stuff and all noted....
Peter.
|
|
|
|
Post by Aurora on Nov 10, 2018 1:14:36 GMT -5
After a week of dog days spent building this body up from sheet styrene, this is the first rough draft, so to speak, sprayed with primer. There is still a lot more work required. A dangerous time - this work is tedious and not enjoyable. Very easy to just toss the thing in a drawer and forget about it.  |
|
|
|
Post by munter on Nov 10, 2018 2:05:38 GMT -5
I feel your pain, Matt.
|
|


