|
|
Post by munter on Feb 10, 2016 21:30:26 GMT -5
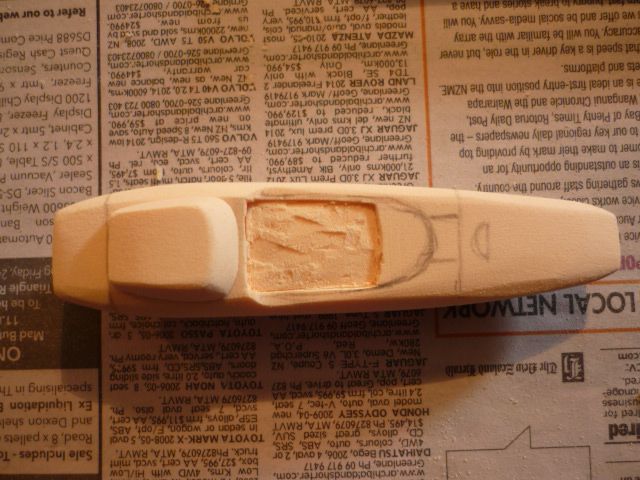
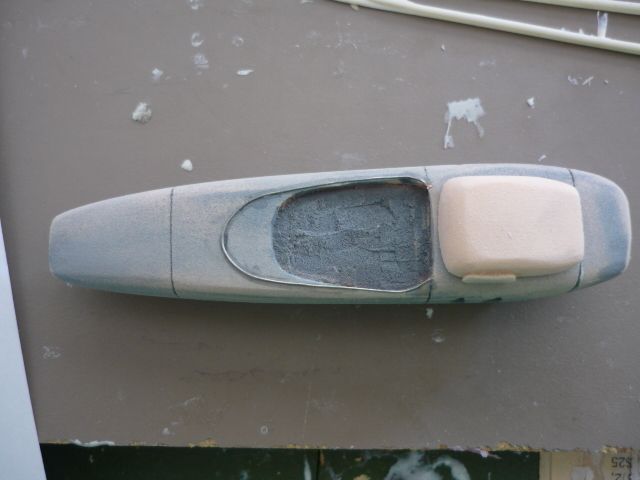
After Mr Mitcham kindly included a piece of what I take to be Ureol with a package he sent me some months ago I have started carving it into something. The something may turn out to be nothing more than some little pieces in the bin but at the moment I am enjoying my experience. There have been some moments of regret but nothing that I would call a fatal error. I have been looking at google images, printed a few plans and have a ModelCars magazine with a plan and article to use as a guide. Main changes during the process have been to cut the engine hump off and make that separately (twice) and possibly something similar for the rear end cowl. Can you tell what it is yet? 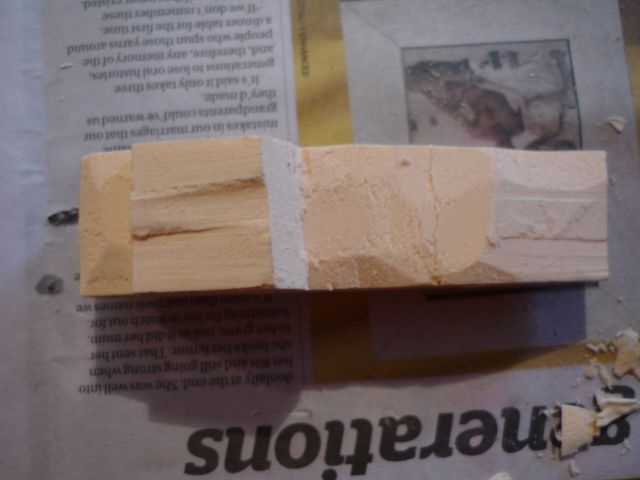 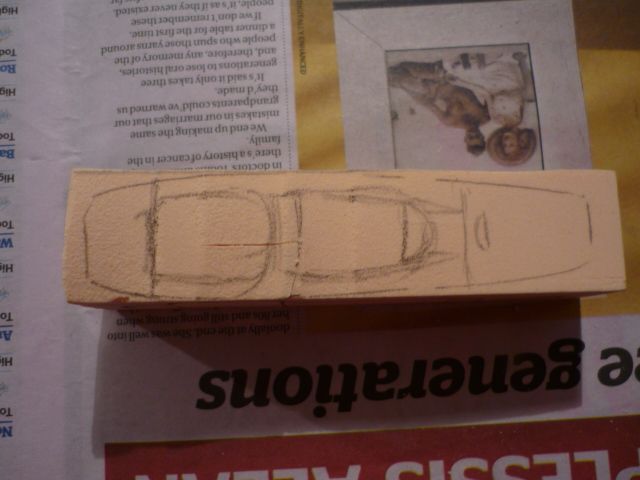  |
|
|
|
Post by David Mitcham on Feb 11, 2016 3:06:50 GMT -5
Hi John
A Honda 271?
David
|
|
|
|
Post by munter on Feb 11, 2016 3:34:49 GMT -5
|
|
Deleted
Deleted Member
Posts: 0
|
Post by Deleted on Feb 11, 2016 5:02:06 GMT -5
A very promising start, John. Don't forget your centre line and wheelbase lines. All measurements come from those.
That looks like the more open form of Ureol. What I call Crunchy Bar.
Cheers,
Martin
|
|
|
|
Post by Chris Wright on Feb 11, 2016 11:00:05 GMT -5
Well apart from it being carved out of a crunchy bar, john that looks stoopendus.
|
|
Deleted
Deleted Member
Posts: 0
|
Post by Deleted on Feb 11, 2016 14:26:09 GMT -5
John, when I worked as a "hard" modeller for the car design industry, I was asked to prototype a new centre stack for a Golf, with hinged arm rest section and all sorts of clever stuff.
I made it all in short time, by hand, of course in a very open grained Ureol that not only was almost exactly the grain of Crunchy Bar, but it was also the same colour!
For a hoot, with the Scottish designer, I made a model of a mobile phone with a big VW sign on it and left it inside the centre stack.
Off home for a long w/e and when I got back to Wolfsburg, there, above where my head usually was, were full-size "blueprints"of the centre stack, where they had scanned the whole thing with lasers while I was away. And best of all was the careful rendition of my VW mobile phone!
Martin
|
|
|
|
Post by munter on Feb 11, 2016 21:27:47 GMT -5
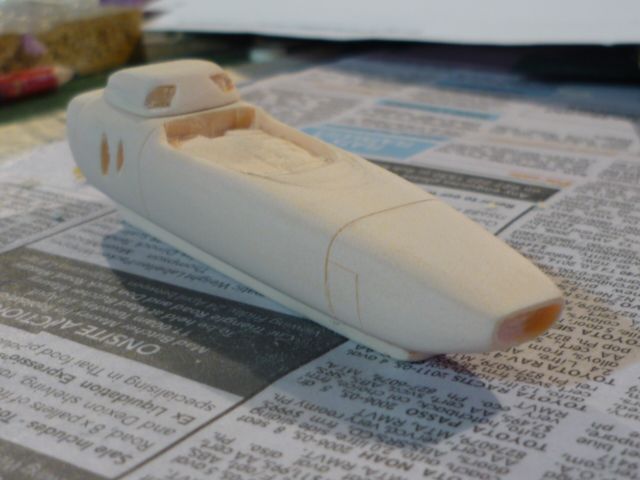
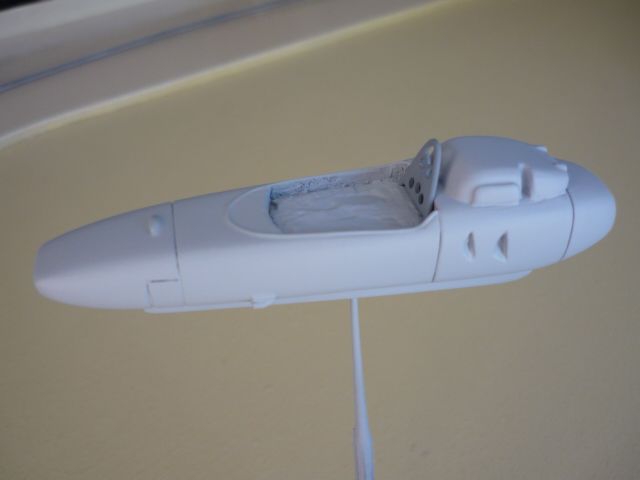
The weather here is too warm for casting but not too warm for carving. I have extended the rear cowl and added some detail shapes. I have yet to eliminate the joins which are still showing either side of the new shut line on the rear...but I am still not close to tossing it in the bin. I have the screen under control(I think) a resin master has been poured from a wooden original. Resin handles the heat from vac forming better. 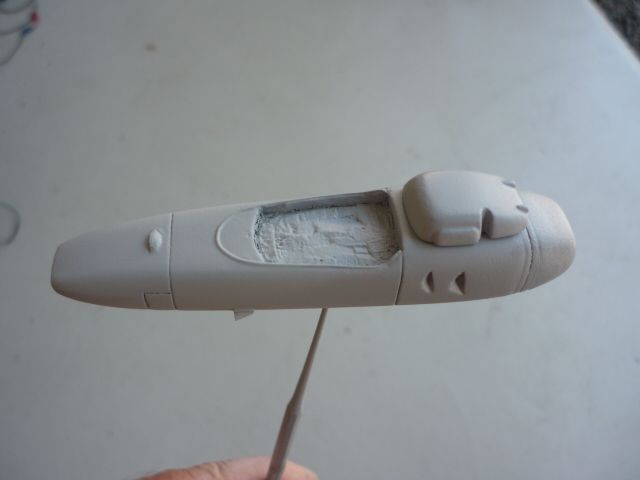 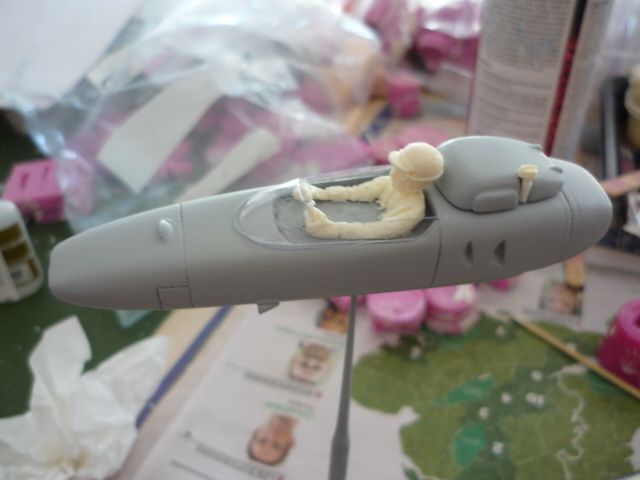 |
|
Deleted
Deleted Member
Posts: 0
|
Post by Deleted on Feb 12, 2016 3:59:19 GMT -5
That's come on very well, John.
Is the screen surround really that sort of pear shape?
I always make my screen patterns to a first moulding to account for any slight shrinkage. More important on closed cars admittedly.
Fill those dips at the rear once you've painted it. The gills at the side could do with a slight verticalisationalism, but apart from those points, great job. Another Jonshell on the way.
Martin
|
|
|
|
Post by munter on Feb 12, 2016 4:25:50 GMT -5
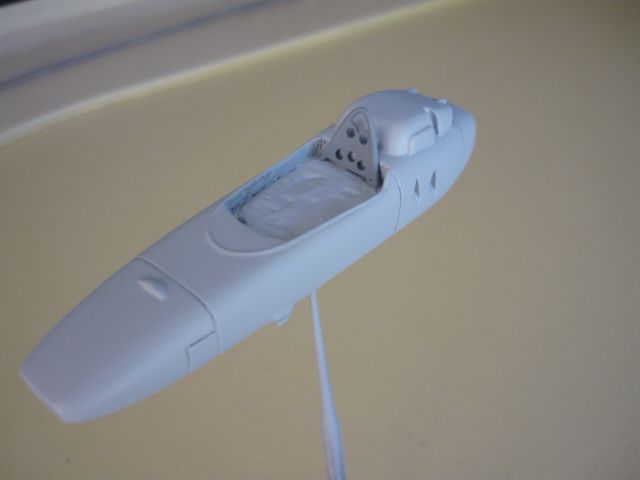
Thanks Martin. This is an exercise in whether or not I can produce a shape that is close to something realistic...I am testing my eye so to speak. I have kind of heeded the wheel base dimension and used eyetrometry to determine the centre line.
Once I started research on the RA271 it became clear that nothing was clear and there seemed to be variety of engine covers and some other rear bodywork differences.
Those body side scallops were on an angle on this model and the screen shape is what it is.
Tomorrow I hope to join the hump to the main body section and then face the next challenge to get some sort of exhaust that I can then produce in resin.
|
|
|
|
Post by David Mitcham on Feb 12, 2016 6:03:36 GMT -5
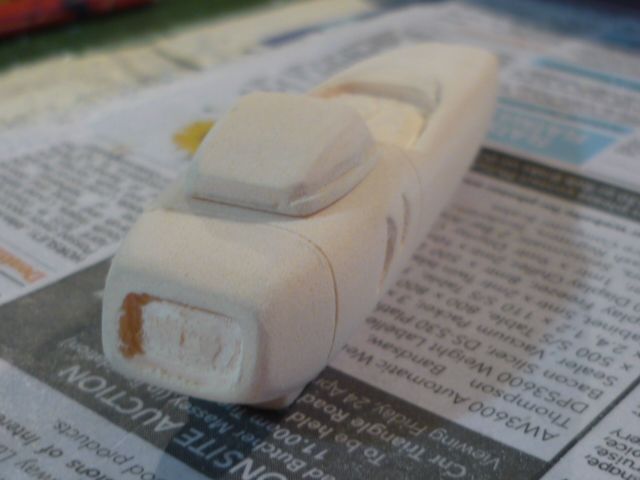
I think it looks great John and really captures the look of the real car. There were no standard versions of the 60's F1 cars; they changed from race to race, and even in the course of a race weekend. Its probably not so different today but the changes are generally more subtle and hidden, in the case of the all important electronics and software.
The exhausts will be a bit challenging particularly as they are 'small bore' but from memory, I don't think they are too spaghetti-like and are more or less in one plane. Micro brass tube and rod?
Best regards
David
|
|
|
|
Post by old23 on Feb 12, 2016 8:54:22 GMT -5
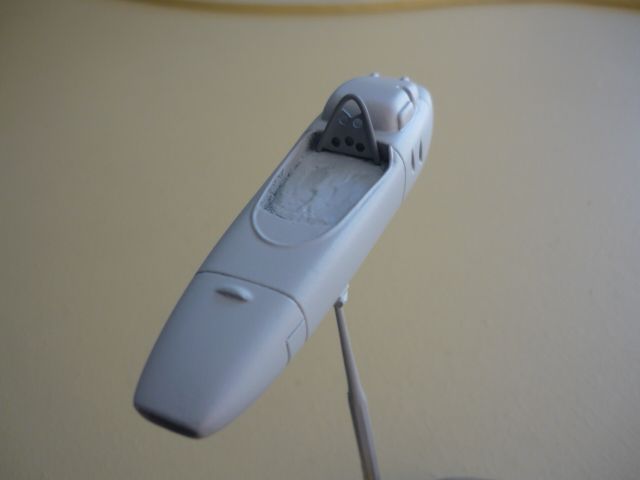
John that looks very tasty indeed. I have one of Dave Jones' shells of this car, as yet unbuilt alas, and yours is shaping up to be every bit as good. The RA271 is such an strange duck. Apparently Honda had purchased a Cooper (or was it a Lotus?) a couple of years previously for study purposes and perhaps a bit of reverse engineering. But instead of simply copying what everyone else was doing, Honda did it their way, coming up with this awkward-looking, transverse V12 powered oddity. Of course the Japanese auto industry was in its infancy then and few gave the car much credit when it was introduced in 1964. However, by the middle of 1965 the revised Honda F1 was on the front row of the grid, ultimately winning the last race of the season and of the 1.5 litre Formula One. That would be unthinkable in modern F1.
A question about the raised cockpit surround you have fashioned from some kind of metal strip: Is the windscreen meant to be mounted inside or outside of it?
Stewart
|
|
|
|
Post by munter on Feb 12, 2016 13:37:28 GMT -5
Hello Stewart. The screen should sit inside the metal strip. My pictures are rather hastily staged. I have found most screens, sorry most builders benefit from having something to locate the screen so I added the ridge to provide a locating edge.
Thanks again David. I will try an idea I have in mind first and then if that fails I will ask for advice and suggestions. I have some small bore brass tube and rod in the parts store.
Yes, they are small bore with few loops and turns but a funny little bell mouth at the tip.
|
|
|
|
Post by munter on Feb 12, 2016 19:39:09 GMT -5
Thank you Martin...I am on plan B....single core copper wire 1mm diameter.
|
|
|
|
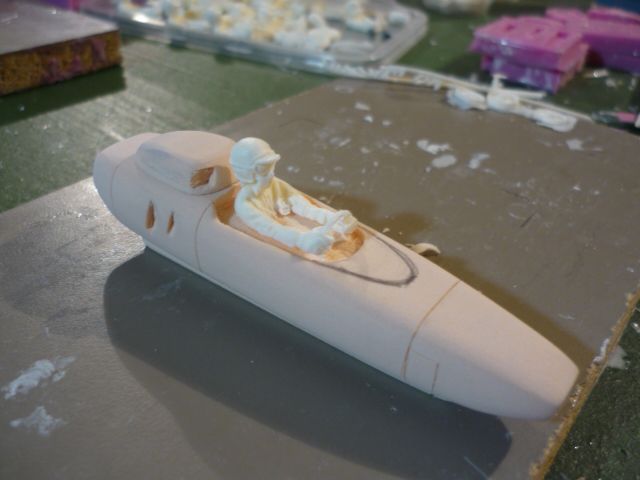
Post by munter on Feb 13, 2016 18:52:26 GMT -5
Small things take time and after some problem solving ie cussing I have ended up with this set of pipes. You can see the eyelets I added to the rear of each pipe and then removed them as too big and too thick. 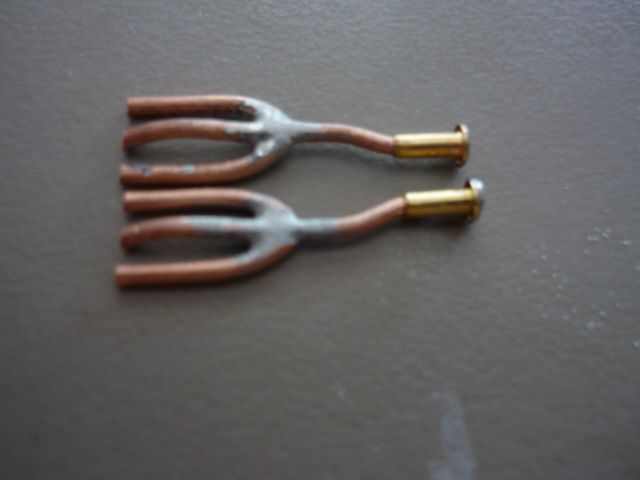 Then with some carved blobs of solder on the ends of the wire. 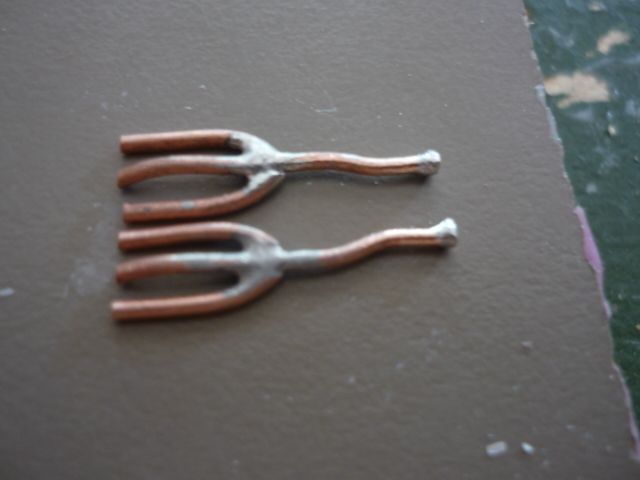 Then with primer 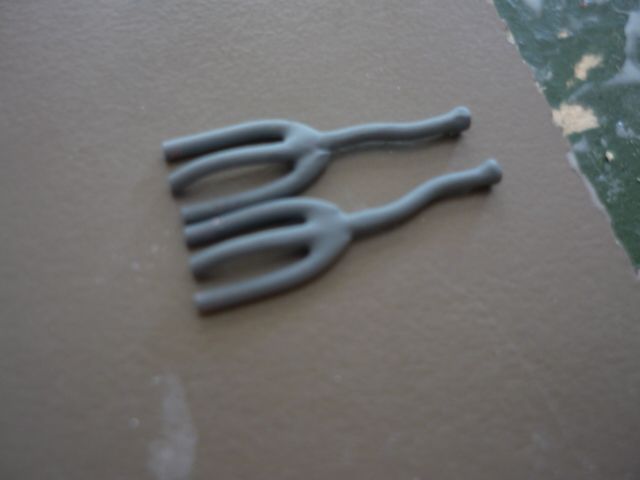 Then offered up to the hump (yet to be fixed in place) 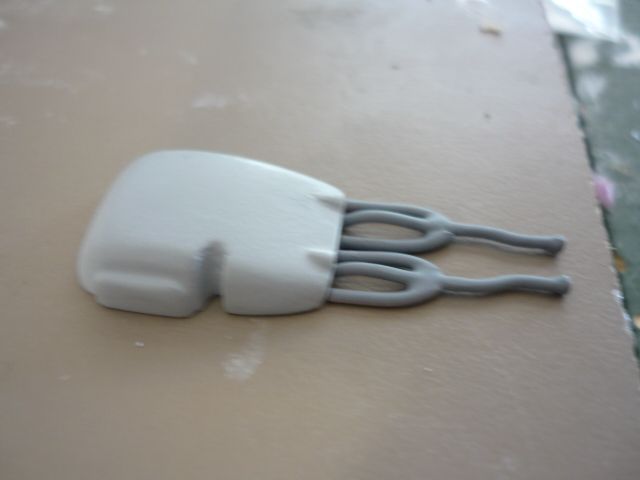 After seeing the pictures I can see some more filing and shaping will help the tips. Next week brings five days of.....work! so I dont think much more will happen for a while. |
|
|
|
Post by munter on Feb 13, 2016 22:50:11 GMT -5
|
|