Post by Taffy on Dec 23, 2020 7:38:52 GMT -5
A building description step by step…..WIP!
The small group that runs the “Vintage 32 Days” has agreed to drive a new class for the next season (yes, we believe in a 2021 season!) This class will feature racing cars from the early days of motoring, pre-1914 to be precise:
The so-called "Edwardians", that George Turner has recently released.
In good time right before Brexit, we took a bulk order.
I want to build two cars and have chosen the “Renault” and the “Fiat”. Fortunately, there is a lot of photographic prototype material for both cars, which I didn't know before, but this now makes my work a little easier - or makes it more difficult how to take it. A structure that approximates the model is of course more difficult if there is sufficient image material available, because then you do not have as much freedom as with insufficient image yield.
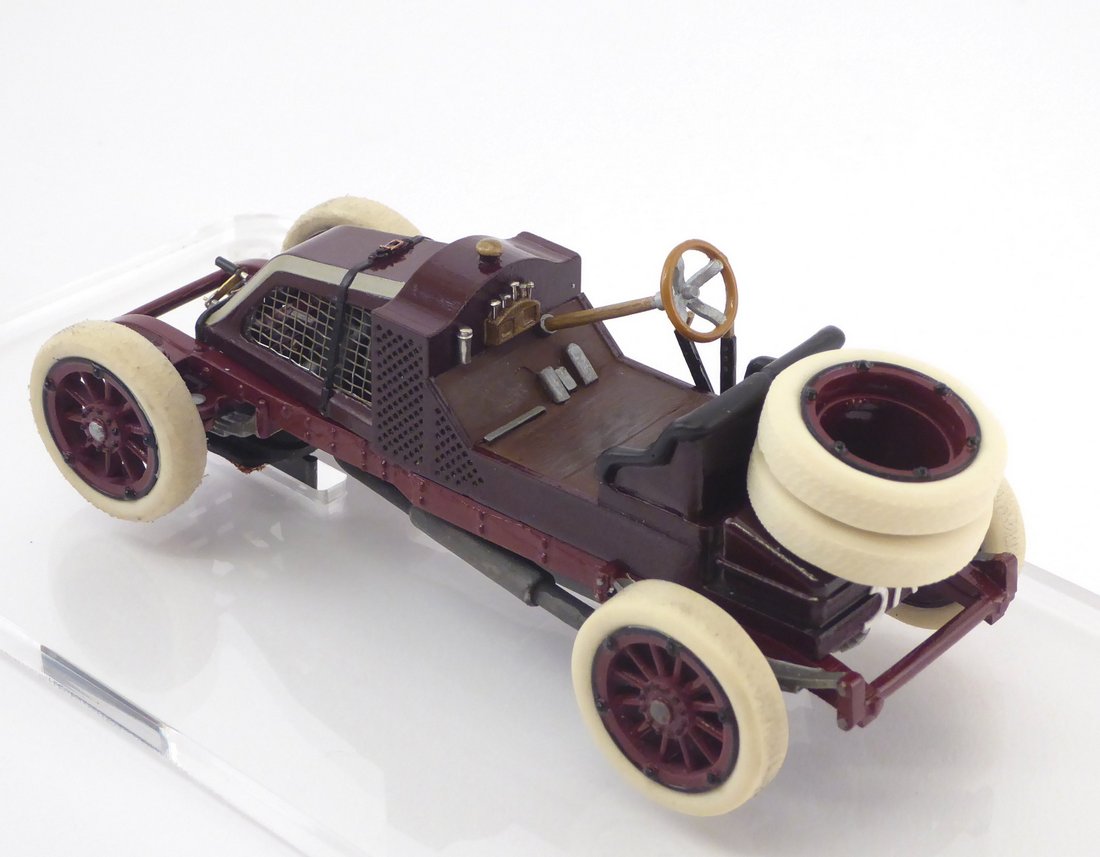
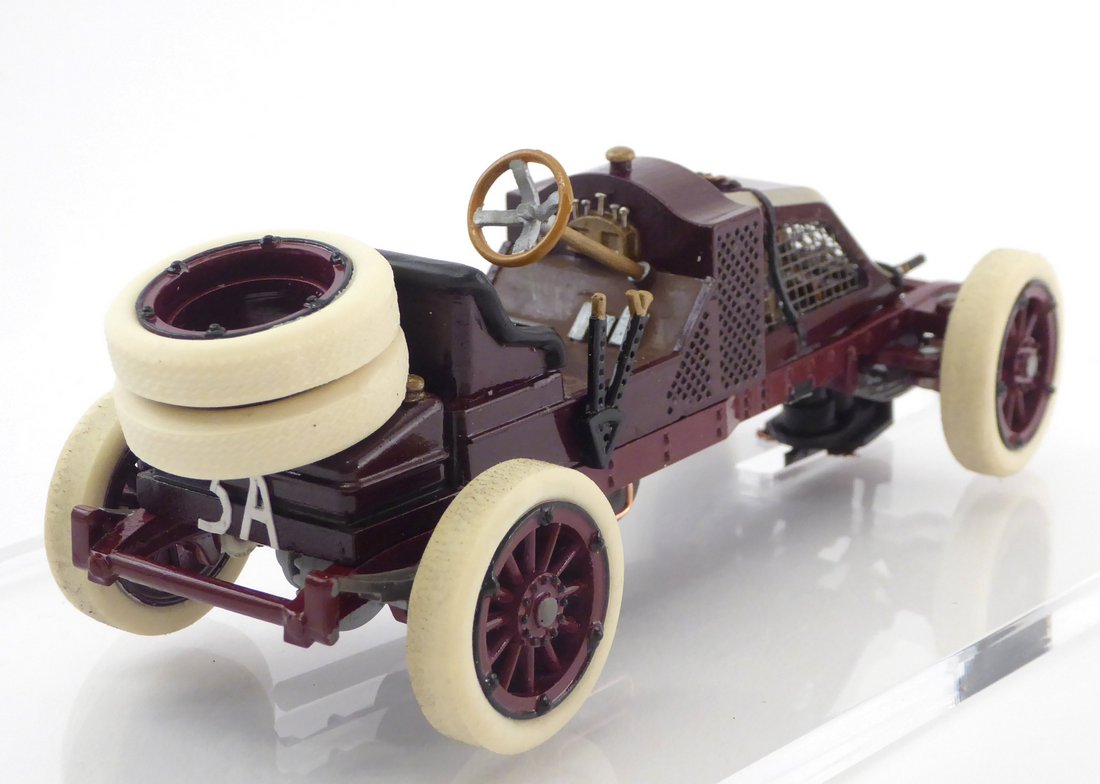
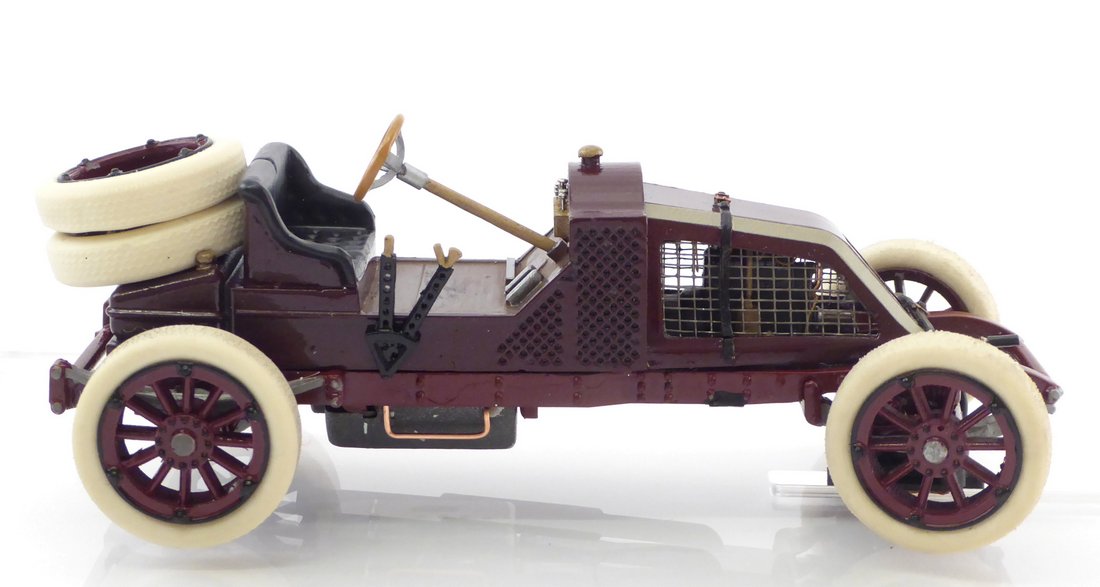
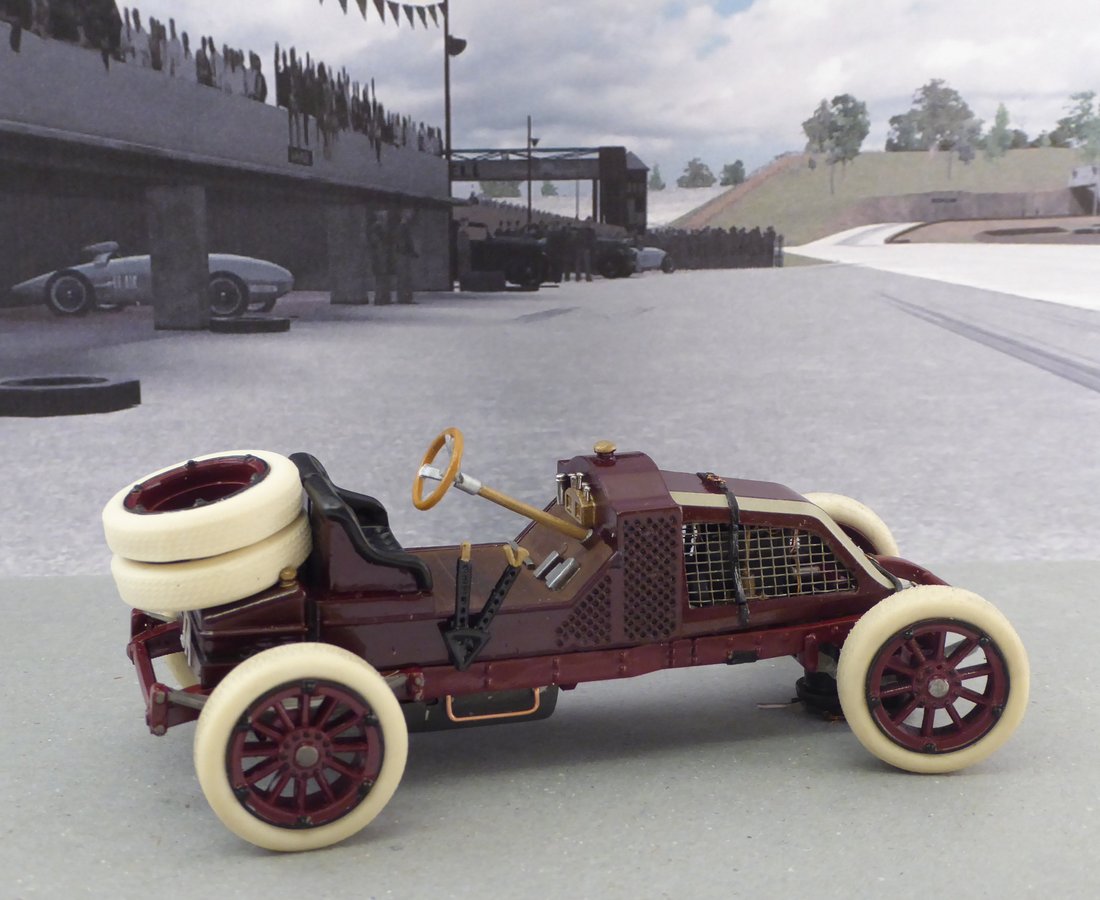
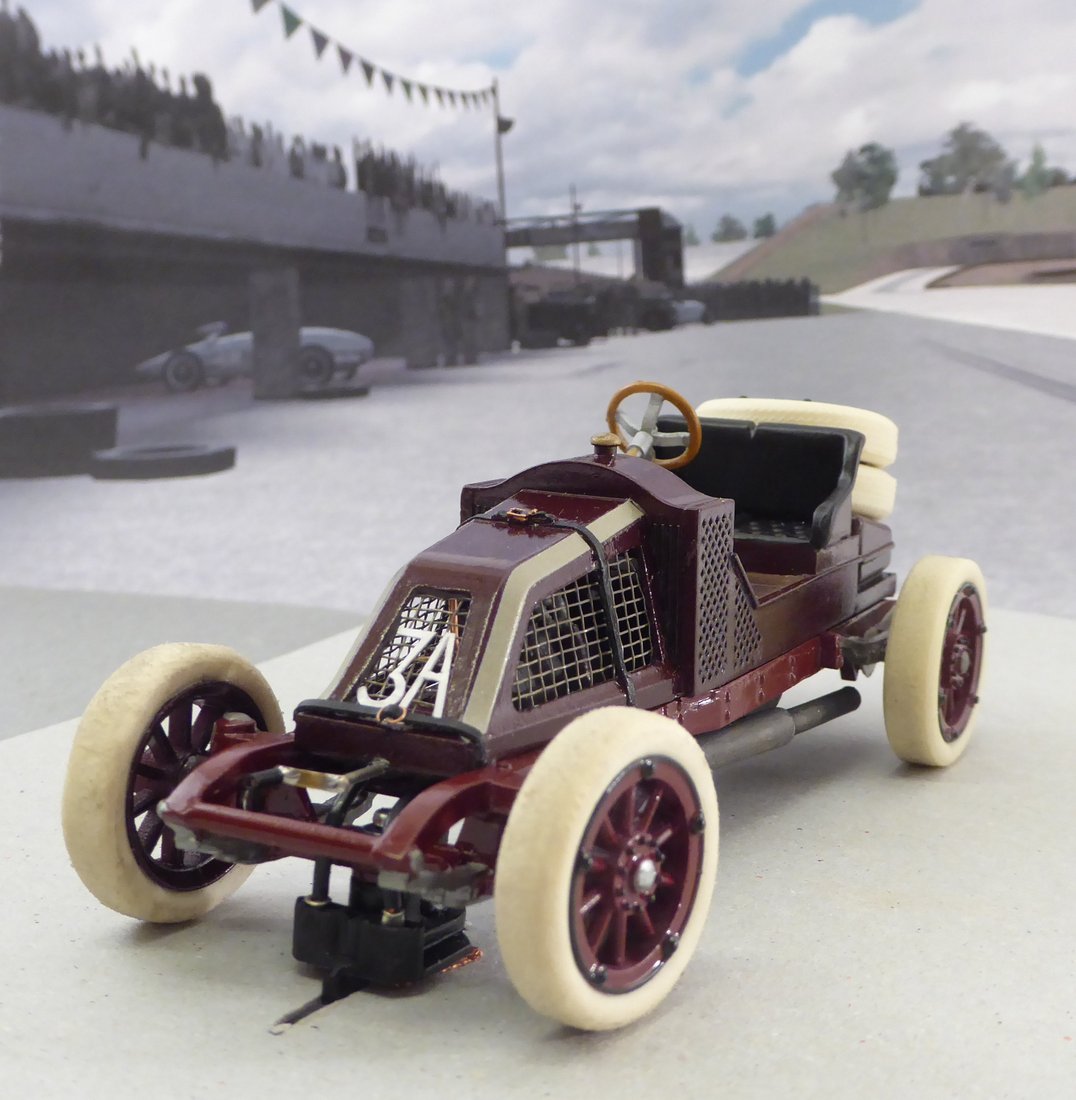
It starts with the Renault, I'll take the liberty of referring to my Renault as “Renault AK”, that is the racing car that in 1906 won the very first race ever called “Grand Prix”. It took place in LeMans, the driver at that time was Ferenc Szisz

(The picture comes from Wikimedia commons)
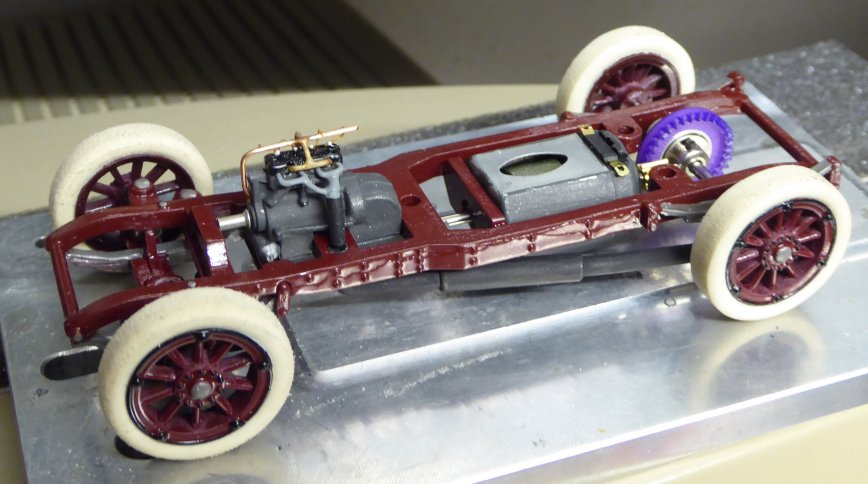
The engine was already producing 90 hp, which was transferred to better bicycle tires. Hammer! George Turner's kit reproduces the model quite well. As usual, George has included a resin chassis. This enables all of his Edwardian kits to be built with front-axle steering.
In the original, the engine was only protected from outside access by a kind of rabbit wire, as you can see here:

(The picture comes from Wikimedia Commons, too)
I took this as an opportunity to mill out the bonnet accordingly in order to make an engine visible behind a thin grille. A part from a Revell kit of the BMW 3/15 PS in 1:24 scale, which I still had in the grab box, serves as the engine block. With the add-on parts that have yet to be manufactured, it will fit well under the hood.
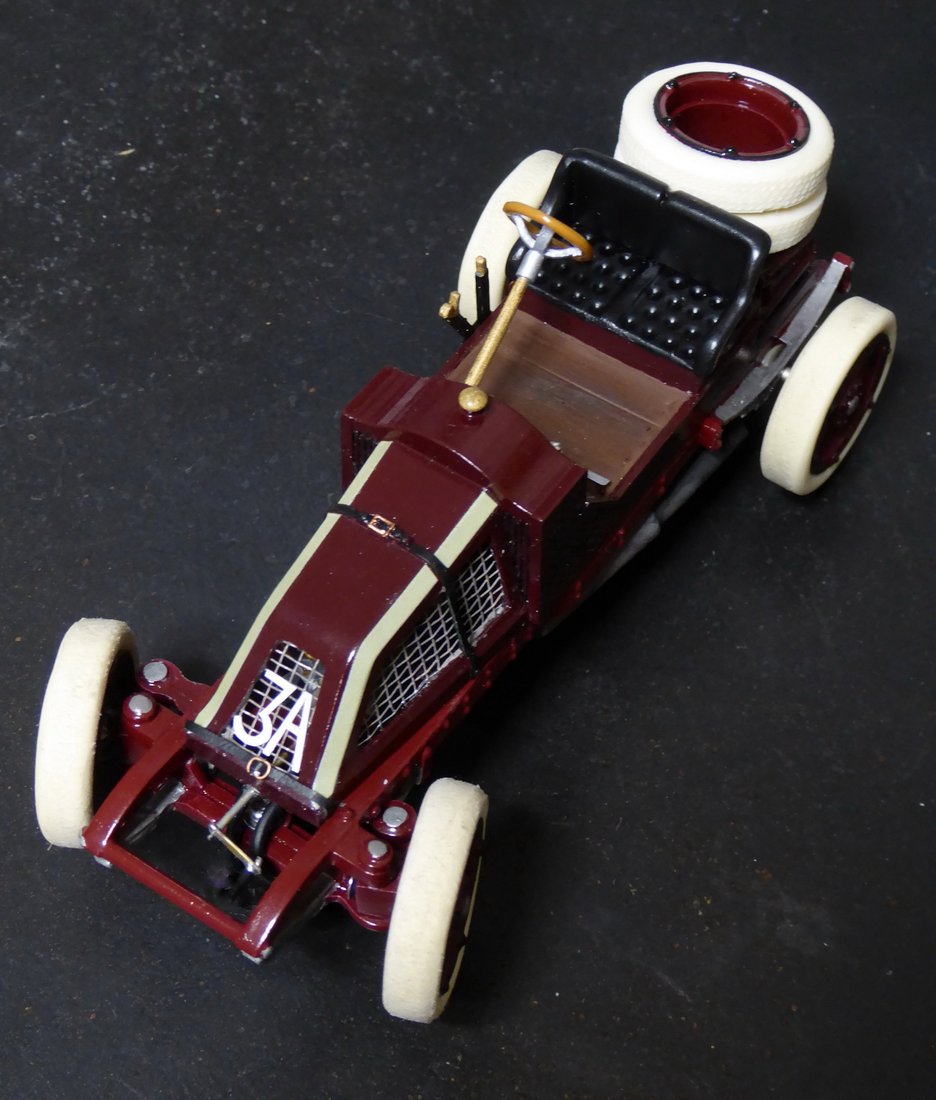
Here I provisionally put the most important parts together to get an impression of the car.

The bonnet is roughly milled out here.
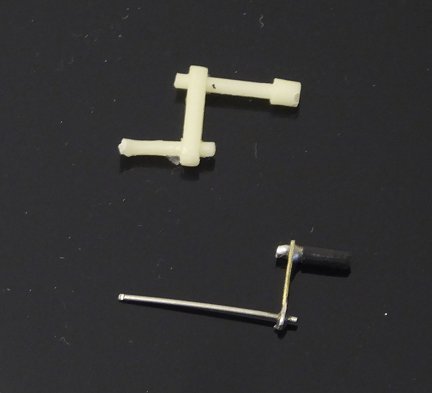
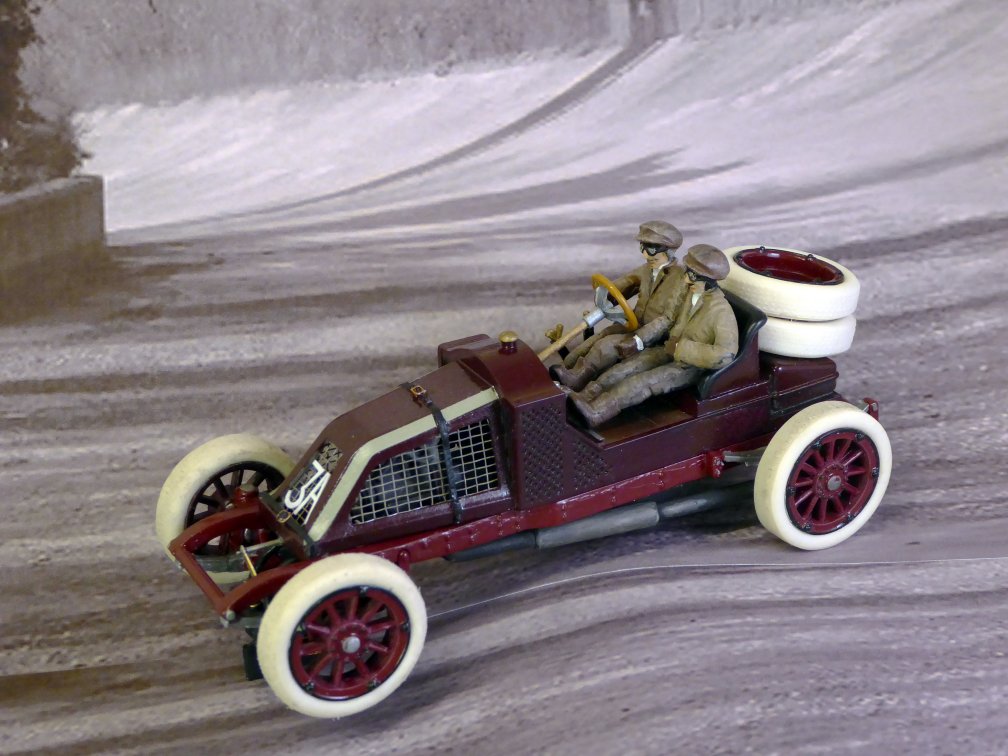
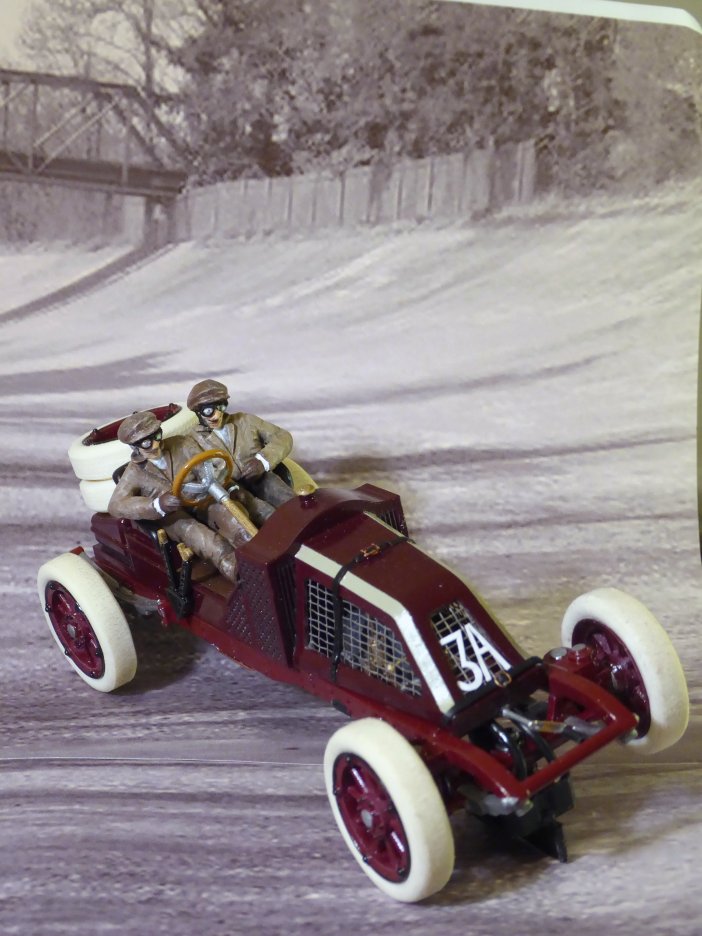
Of course, the kit also contains driver figures and other additional parts. The prototypically natural-colored tires, as well as the guide keel, come from Pendleslot.
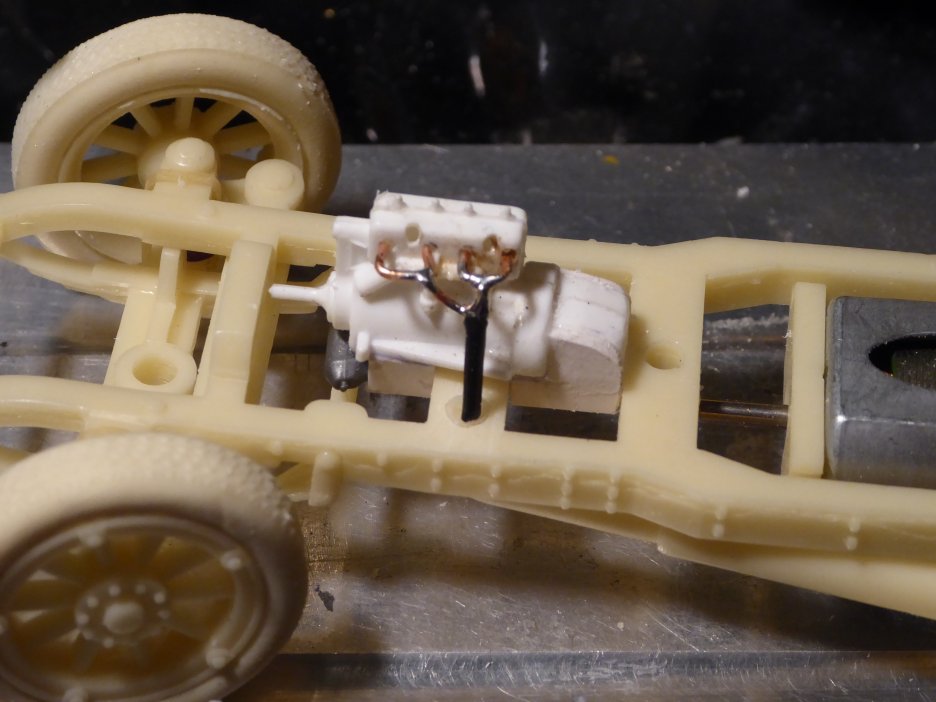
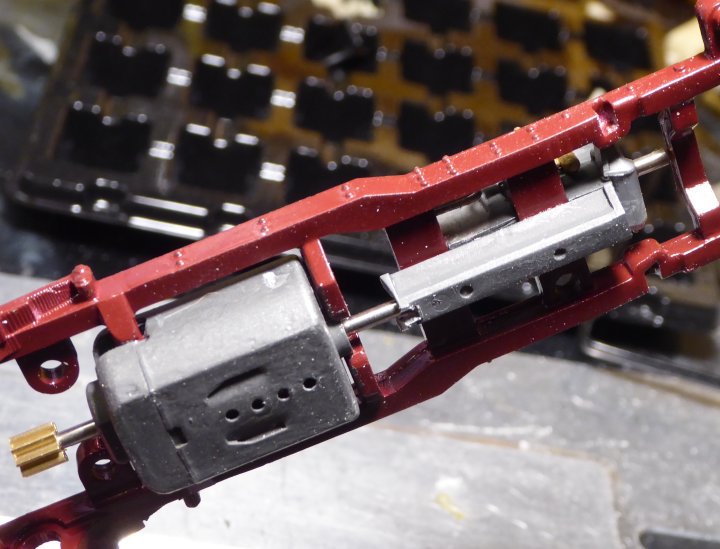
The adaptation and detailing of the model engine is essentially complete. A little soldering work was required. First, I took on the intake pipes, which run across the engine from the right - here the carburettor sits next to the engine (comes from a 1:24 scale model, too) to the left (here the fresh gas flows between the manifolds into the combustion chambers). The duct for the ignition cables runs upwards from the front and then lengthways over the engine. For reasons of stability, I soldered these parts together, but I will hide this later with a different color design. The alternator sits at the bottom in front of the engine.
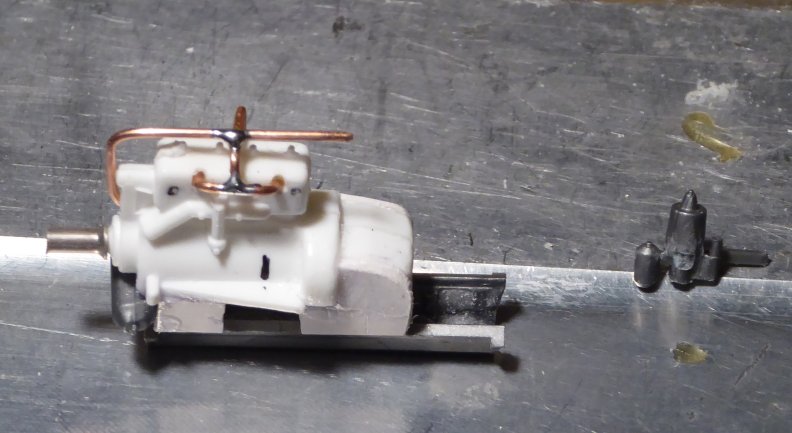
Then I removed these copper wires, which were soldered together, in order to represent the exhaust tract, also made of copper wire. The position for the exhaust is given on the model.
I don´t know if I use the intended kit part for the exhaust (that's pretty voluminous ...) or build something myself.
![]()
 "]
"]
Whether I also will reproduce the connections to the radiator depends on how much of the engine you can see through the bonnet afterwards. I'm holding that back for now. Now it continues with the reinforcements of the front axle and the painting preparations.
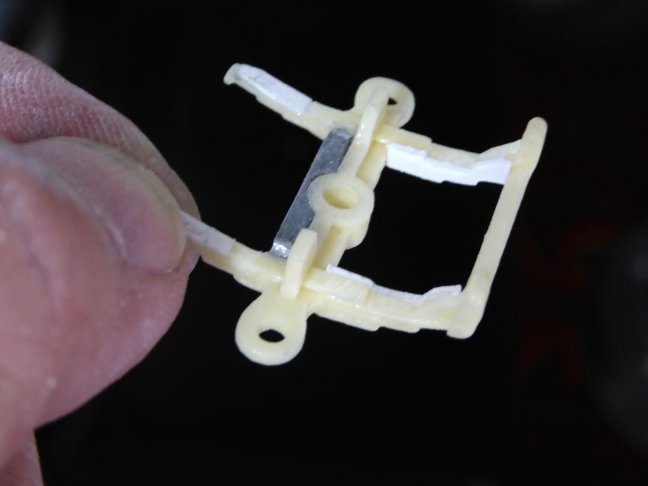
I reinforced the lower part of the front axle support at the particularly critical points with polystyrene strips (white) and, in addition, I put a little more pressure on the front axle by glueing a narrow strip of lead across the area of the guide keel mount.
![]()
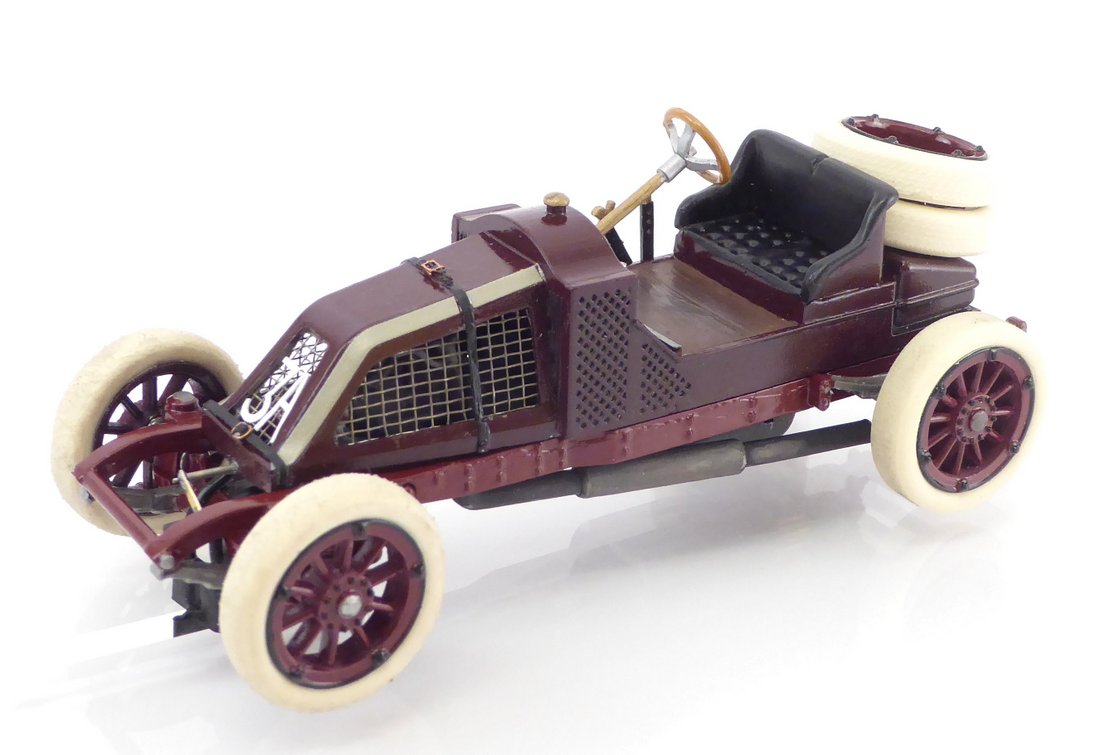
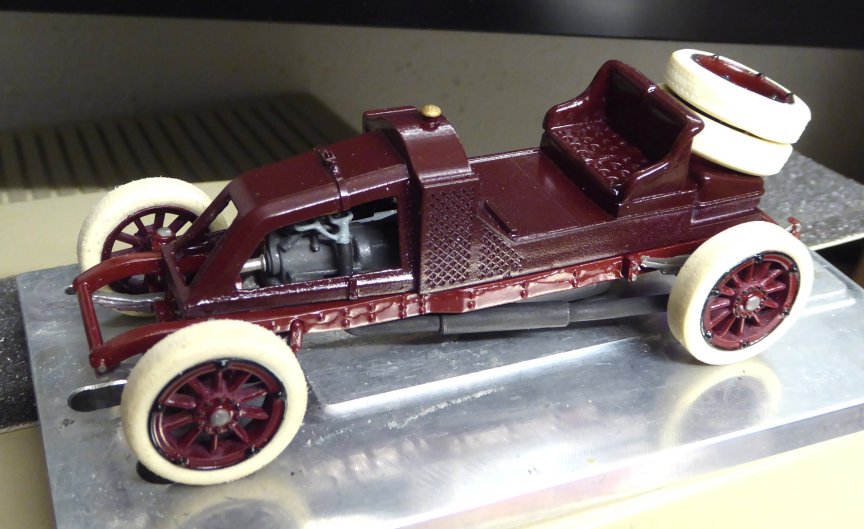
Then it was time to prime and paint. I chose a deep, dark red as the color. I had a corresponding spray can of a hardware store synthetic resin paint standing around unopened for a long time, now it should serve me.
Shaken up: a medium-light violet appeared. Impossible!
Shaken again: the color transforms into an extremely dark, almost black red. Ingenious!
I sprayed the body.
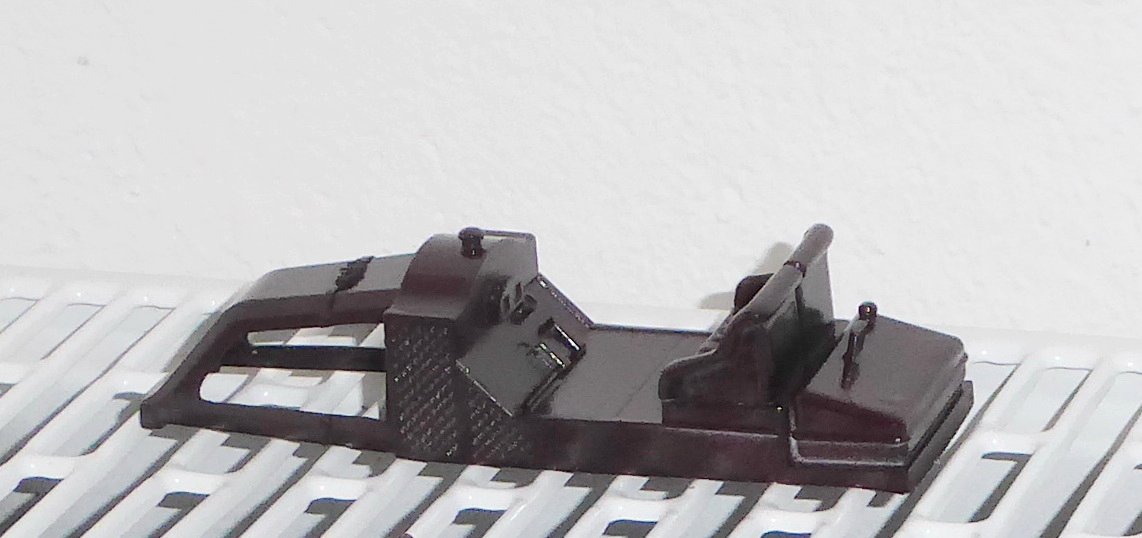
Now all the individual parts. Shaken again. The color changes to a deep burgundy red….
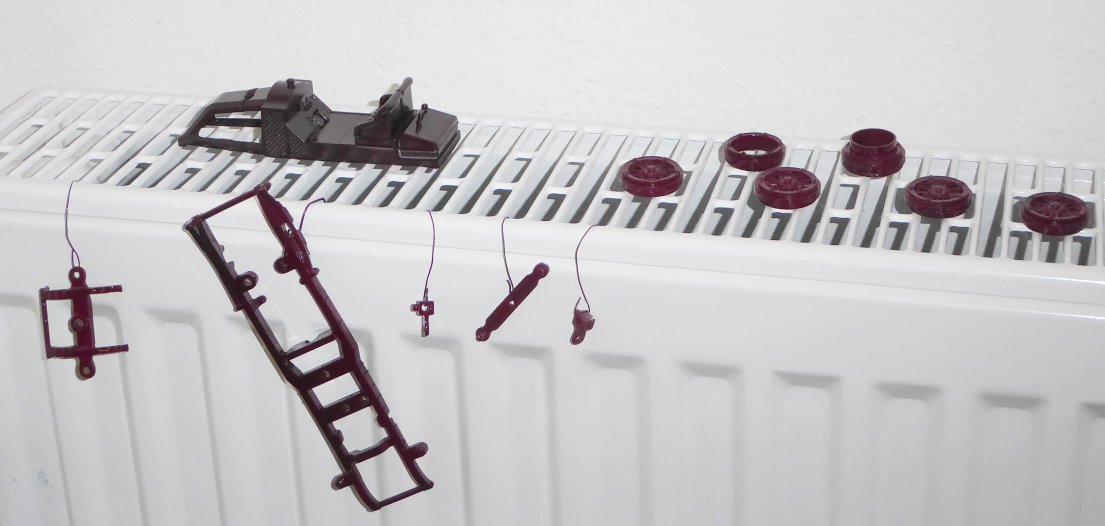
Note: Spray cans that have been standing unopened for a long time should be shaken particularly thoroughly!
But I'll leave it at that. Chassis/wheels on the one hand and the body on the other hand have different colors, but they go well together. Sometimes chance can also lead to good results.
Now it's time to let the paint dry. Who has read it above: synthetic resin paint. That means: at least two days of drying time.
I wish you all a Merry Christmas!
Best regards,
Taffy
The small group that runs the “Vintage 32 Days” has agreed to drive a new class for the next season (yes, we believe in a 2021 season!) This class will feature racing cars from the early days of motoring, pre-1914 to be precise:
The so-called "Edwardians", that George Turner has recently released.
In good time right before Brexit, we took a bulk order.
I want to build two cars and have chosen the “Renault” and the “Fiat”. Fortunately, there is a lot of photographic prototype material for both cars, which I didn't know before, but this now makes my work a little easier - or makes it more difficult how to take it. A structure that approximates the model is of course more difficult if there is sufficient image material available, because then you do not have as much freedom as with insufficient image yield.
It starts with the Renault, I'll take the liberty of referring to my Renault as “Renault AK”, that is the racing car that in 1906 won the very first race ever called “Grand Prix”. It took place in LeMans, the driver at that time was Ferenc Szisz
(The picture comes from Wikimedia commons)
The engine was already producing 90 hp, which was transferred to better bicycle tires. Hammer! George Turner's kit reproduces the model quite well. As usual, George has included a resin chassis. This enables all of his Edwardian kits to be built with front-axle steering.
In the original, the engine was only protected from outside access by a kind of rabbit wire, as you can see here:
(The picture comes from Wikimedia Commons, too)
I took this as an opportunity to mill out the bonnet accordingly in order to make an engine visible behind a thin grille. A part from a Revell kit of the BMW 3/15 PS in 1:24 scale, which I still had in the grab box, serves as the engine block. With the add-on parts that have yet to be manufactured, it will fit well under the hood.
Here I provisionally put the most important parts together to get an impression of the car.
The bonnet is roughly milled out here.
Of course, the kit also contains driver figures and other additional parts. The prototypically natural-colored tires, as well as the guide keel, come from Pendleslot.
The adaptation and detailing of the model engine is essentially complete. A little soldering work was required. First, I took on the intake pipes, which run across the engine from the right - here the carburettor sits next to the engine (comes from a 1:24 scale model, too) to the left (here the fresh gas flows between the manifolds into the combustion chambers). The duct for the ignition cables runs upwards from the front and then lengthways over the engine. For reasons of stability, I soldered these parts together, but I will hide this later with a different color design. The alternator sits at the bottom in front of the engine.
Then I removed these copper wires, which were soldered together, in order to represent the exhaust tract, also made of copper wire. The position for the exhaust is given on the model.
I don´t know if I use the intended kit part for the exhaust (that's pretty voluminous ...) or build something myself.
"] Whether I also will reproduce the connections to the radiator depends on how much of the engine you can see through the bonnet afterwards. I'm holding that back for now. Now it continues with the reinforcements of the front axle and the painting preparations.
I reinforced the lower part of the front axle support at the particularly critical points with polystyrene strips (white) and, in addition, I put a little more pressure on the front axle by glueing a narrow strip of lead across the area of the guide keel mount.
Then it was time to prime and paint. I chose a deep, dark red as the color. I had a corresponding spray can of a hardware store synthetic resin paint standing around unopened for a long time, now it should serve me.
Shaken up: a medium-light violet appeared. Impossible!
Shaken again: the color transforms into an extremely dark, almost black red. Ingenious!
I sprayed the body.
Now all the individual parts. Shaken again. The color changes to a deep burgundy red….
Note: Spray cans that have been standing unopened for a long time should be shaken particularly thoroughly!

But I'll leave it at that. Chassis/wheels on the one hand and the body on the other hand have different colors, but they go well together. Sometimes chance can also lead to good results.
Now it's time to let the paint dry. Who has read it above: synthetic resin paint. That means: at least two days of drying time.
For me it means not to get impatient now. If I start work too early or if I am careless and mess up the body, I would have to repaint without achieving the original color and would have to wait again.
So maybe I'll start something else in the meantime.
That's why the Renault won't continue until after Christmas. I wish you all a Merry Christmas!
Best regards,
Taffy
 Taffy
Taffy


 -- I apologize, I am using google translator. That doesn't always give good results....