Deleted
Deleted Member
Posts: 0
|
Post by Deleted on Oct 2, 2013 20:32:48 GMT -5
|
|
|
|
Post by Phil Kalbfell on Oct 3, 2013 8:38:56 GMT -5
Good to see you showing some of your builds over on this Forum DM
|
|
|
|
Post by Peter Seager-Thomas on Oct 3, 2013 12:04:52 GMT -5
The D50 in particular looks really good. You take a good photo DM
Peter.
|
|
|
|
Post by Mark Huber on Oct 3, 2013 14:25:53 GMT -5
Thank you for sharing pictures of your builds and welcome to the Forum.
|
|
Deleted
Deleted Member
Posts: 0
|
Post by Deleted on Oct 30, 2013 16:34:48 GMT -5
Here is an updated photo of the Talbot - I think it looks a bit better now that I have Peter's wheels on it cheers David 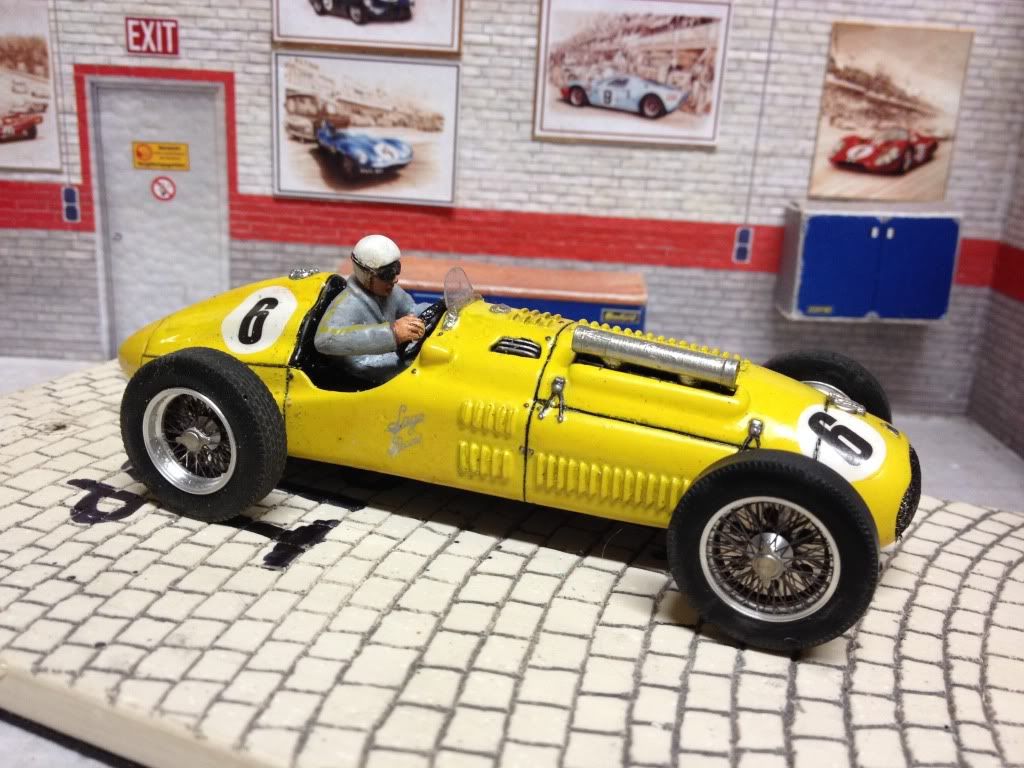 |
|
|
|
Post by Chris Wright on Oct 30, 2013 17:25:51 GMT -5
Peter's wheels are the best, but please paint them with silver paint, they'll look even more realistic, and match the rest of the car. Great job by the way. Chris P.S. David did your display "Block" come with a Lola t70 attached?  |
|
Deleted
Deleted Member
Posts: 0
|
Post by Deleted on Oct 31, 2013 3:02:04 GMT -5
Yes Chris I have the Fred McCluskey Pacesetter car - I also did it in 1/24 scale using one of the Tamiya repro kits i270.photobucket.com/albums/jj113/dmpster/ff0b0cf2.jpgTo be honest I have been a little hesitant to paint the wheels as I was afraid I would stuff them up. I am currently building a MG K3 for a mate and I need to paint the wheels on it - it is slowing the whole project down. What approach would you recommend - assemble then spray them or paint the pieces and then assemble? cheers David |
|
|
|
Post by Chris Wright on Oct 31, 2013 9:22:50 GMT -5
Hi David,
I have the Gurney T-70 Lola, one day I'll put a decent chassis under it, and a Dummy Ford motor in it.
Painting Peter's wheels: I do them in pieces, using Tamiya metal primer, and gloss silver. That way you can brush paint the interior of the wheel to resemble a drum brake.
Glue together with thin super glue and epoxy.
Chris
|
|
|
|
Post by nuvolari on Nov 1, 2013 5:42:16 GMT -5
Hi,
It seems everybody has got it's technique.
I would say start with a good preparation.
I airbrush everything with thinner based paints, like Humbrol enamel and for some metallic effects in combination with Alclad.
But before you even think of painting, you should first start by deciding if it's better to assemble before, or after you've painted the wheels.
In this case I would suggest before assembly.
Sometimes it's better to assemble the wheels before, like I did with the open wheels on the Darracq's.
But then again, these are soldered together and not glued
The materials I need before I start are:
-throw away latex gloves
-very thick wooden cocktail sticks (the ones you use to make BBQ brochets with)
-a few wooden planks, about 6x approx. 10cm x 10cm, with drilled out holes that fit the cocktail sticks
-a bottle of acetone (do not use nail polish remover, it contains oils) and a clean jar
-superglue
-a sharp knife
-a primer paint (I use humbrol nr 1),final color, depending on your goal a varnish, or if you use acrylics, go for what Chris suggest
-a place where you can leave work undesturved, warm and as much dust free as possible.
-and perhaps the most important thing patience
How to go ahead:
-Start by making sure all the parts fit together well, before starting the paint process.
-take your jar, fill it with some acetone
-start to degreasing all the parts by throwing them in a jar filled with acetone
-from this point on, do not touch the part with your bare hand, or you will put grease on them again
-take your socked parts out of the acetone with some tweezers, I use an old porcelain plate to dry them on, do not put them on any plastics or the acetone glue them together
-then take your plank push your cocktail stick in with the sharp point upwards
-put on your gloves and put every insert on a sticks point with a very slight pressure, just you don't blow it away while air brushing
-the outer rims I glue on there side to a plank with a small drop of superglue, these break of very easy when painted
-your ready to paint with oil based lacquer or acrylic
a few paint tips
-spray Always in thin layer and take you time to let it dust free dry before applying next layer
-I prefer at least a min 12h dry after the primer
-when spray painting don't start to paint on the object, but start to spray next to the object and then go over it in a waving manor
-do not paint the inside of the outer rim, this is useless, because you don't see this part and can lead to no fitting inserts due to the thickness of the paint and glueing problems
-you can also dry brush the rims after assembly to put on some effects
-should something go wrong in the process, just though everything back in the acetone and start all over again
I think this sums up everything a bit to come to a good result, but most important take you time and out of experience do it when your alone
Cheers,
Danny
|
|
|
|
Post by Peter Seager-Thomas on Nov 2, 2013 15:38:58 GMT -5
I do much the same as Danny. On the website are some'Assembly Suggestions' which are a combination of my own ideas combined with feedback from those who have built these wheels. The use of cyano/Superglue is almost essential as with this adhesive the wheels can be dis-assembled, though with most wheels this will involve acetone which will wreck the paint. This is why I recommend dry assembly before the parts are even painted. I paint all parts at the same time.  The above image shows a simple painting jig, cocktail sticks in the centre for the hubs, with kebab sticks on each side for spoke etches and the actual wheels. I paint the wheels in one piece, centre, rim and spacers if used. Except for chrome wire wheels, wire wheels for cars were in the past always painted. Alloy rims on motorcycles were unpainted, but bike spokes are plated, (apart from some modern ones which can be stainless) so corrosion was not a problem. Only recently have plated spokes been available for cars, with the increased popularity of polished alloy rims. More likely, such rims will use polished stainless spokes. such spokes are not so strong. I doubt that painting a built (model) wheel is practical unless it is one of the 'open' wheels. For wheels with a closed centre, I'd guess that use of an airbrush at a very low pressure might work. Peter. |
|
|
|
Post by Brian on Nov 19, 2013 14:49:08 GMT -5
David, I'm running out of adjectives for the cars I view on this forum.
Simply stunning cars, thank you for sharing.
Brian
|
|


