|
|
Post by Chris Wright on Apr 4, 2015 10:12:57 GMT -5
Very impressive Rosco, looks incredible, have you given any thought to how you're going to install the windscreen yet?
Chris
|
|
|
|
Post by munter on Apr 4, 2015 15:25:43 GMT -5
Wow, that is some build coming together. It also tells me Rosco is a man of skill, foresight, patience and knowledge.
Fantastic.
|
|
|
|
Post by Ember on Apr 4, 2015 16:12:26 GMT -5
Looks spectacular, Rosco. How does it run?
|
|
|
|
Post by rosco01 on Apr 4, 2015 17:07:19 GMT -5
Thanks Chris - well, windscreen - sort of.... I've cut out the vac formed screen, but it's not as clear and unblemished as I'd like.
I may have a go at making up a block and forming one of my own from drink bottle plastic over a hand made block using a heat gun..... trial, only...probably won't work.
I will fit the vac screen today - and will most likely try to stake it from the inside in a couple of discreet locations - then simply use canopy glue around the internal perimeter.... never done a screen before.
My original "plan" was to drill #80 holes around the perimeter and fit brass rod - so replicate the mounting screws on the proto-type... this is not possible as the screen must sit on top of the dash - I errantly fitted the dash first, and there is insufficent screen material around the sides to drill through the body into it.... I'll do better next time.
Munter - your assistance, guidance and very factual information and suggestion during this entire build (not to mention the great resin body) are deserving for credit of a lot of this model.
I will change a few things with the second build - and probably even more with the third. The suspension detail will be the same - but of a finer grade material... this lot now looks very "clunky" to me... I'll slip down to 0.80 mm rod for the wishbones and torsion bar assembly.
Ember, yes - it has run on a track for about 10 minutes in total.... it gets more tomorrow - I'm hoping to have at least 30 minutes up on it before I dispatch it for the series.
As for performance - well, I had absolutely no idea how these little cars were supposed to run.
The chap who allowed me access, and drove it on its maiden tells me that it performs with lap times in the mid-field range of last year's event... I'm more than happy with that.
I expect that this year, it will probably slip down the ladder a bit - as entrants have probably gained a bit more performance from last year.
The wheel-track is under the limit by around 1.3 mm both front and rear.
I have no idea how to weight the model for performance - but am inclined to disregard this.... it certainly doesn't need any further weight.
Last check, with everything on the scales - it came in at 60.3 grams. I don't believe the screen and glue will amount to much - or the decals.
The paint was stripped - so, there shouldn't be any further gain there either.
I was never going to build this little car as being competitive - nor for any scale judgement.
I'll be more than happy if it doesn't disgrace itself during the series.... or my work.
It's sole intention was to finally scratch build a slot car... and I'm reasonably happy with the result..... learned an awful lot along the way... and have so, so much more to learn.
I must categorically state here, Ember - it was the building of your Lotus which entrenched my desire to build.
Update - clear coats on, silver stripe on, top clear coats on, decals on and sealed.
Model will be re-assembled today and windscreen fitted.
Will post pictures later of the most likely dismal result..
frats,
Rosco
|
|
|
|
Post by rosco01 on Apr 5, 2015 6:13:33 GMT -5
Ok folk - milestone tonight...... now in finished state for the upcoming series... If it runs ok tomorrow at Cheltenham - I'll leave it with Stubbo .... Wasn't entirely happy with the finish today - the paint really needs a bit more time to pull down and be compounded. It appears that whatever is still underneath has not pulled down - and it's caused that great finish I had two days back to now need a polish... it was like glass - now it looks like someone has dropped a small droplet of water into the surface.... not rippled, but not glass.... it will polish out, just disappointed - that's all. Windscreen - my first.... well, next one will be better. I had intended to "stake" the windscreen in at the rear until I had canopy glue take hold all around.. but, there simply wasn't enough meat left in the vac formed screen to afford this.. so - back to plan "B" - cyano instead. I ended up placing four dots of it discreetly - which held it nicely in place (with bows and buckles around the non-tethered parts. I sprinkled a fine dusting of baking soda over these drops (which is a favorite trick of mine from the micro helicopter hobby) - which causes the c/a to go off in a flash - and becomes a sandable/drillable and very sound base . I then went about running some canopy glue around the joint - in three sessions, until got the result (or, as best I could get) to finish it. Once that was done, I then set about fitting the mirrors... again, poked them through the holes and a drop of cyano on the underside - then a sprinkle of baking soda. They are rigid enough for track work - but should the unfortunate result - they will "give" instead of breaking open the body. Finally, it all went back together like clock-work.... I had to do a little bit of work on the body mount post - it had cracked open.. so, set about the cyano and baking soda again... it really needs another day spent on it to get this right... and I will when it returns in 3 months.. but, for now - there's a small dollop of Loctite in there which will hold the c/sunk 10 BA brass screw in place.. and, which won't be an issue to remove if it needs attention during the series.... I simply ran a strip of masking tape around the chassis with my name on it in Laundry Pen.... Connected it up to my power supply and gave it a run for 10 minutes at differing voltages..... I can't detect any change from the previous time I did this prior to it making its debut at Cape Patterson on a track. So, for those very patience (and bored at times) folk who have followed this thread since the beginning - we're done...... for now.... Pix.... 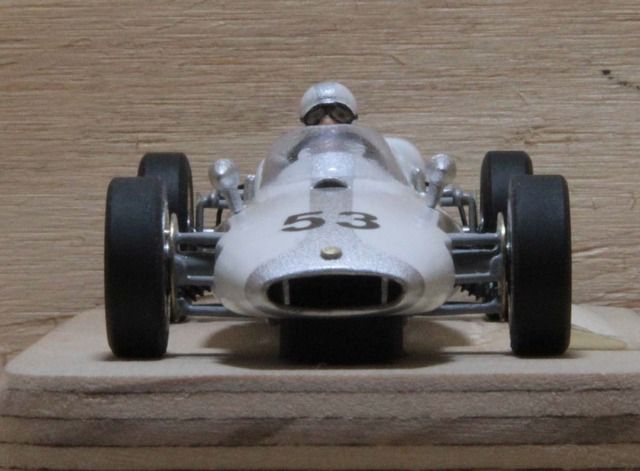 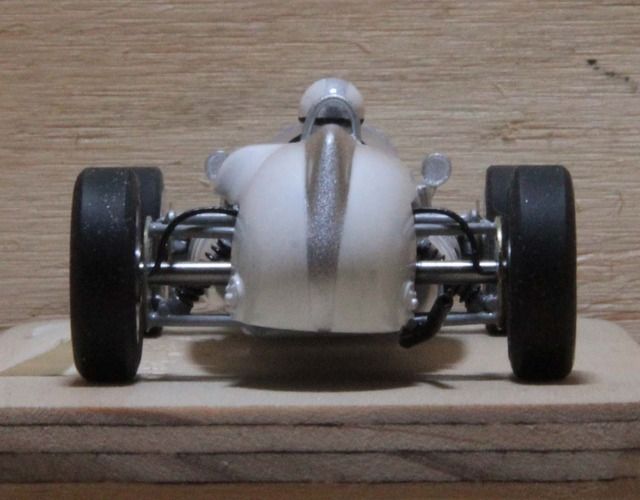 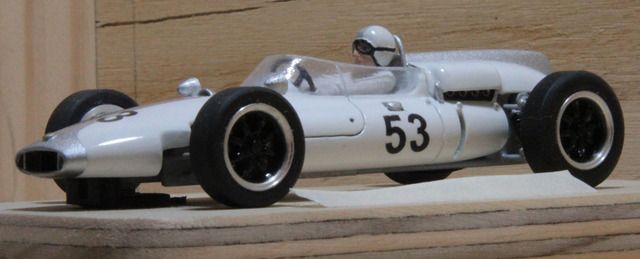 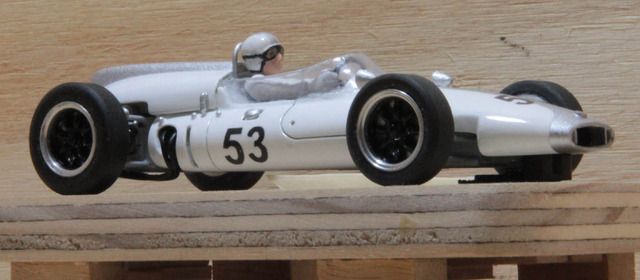 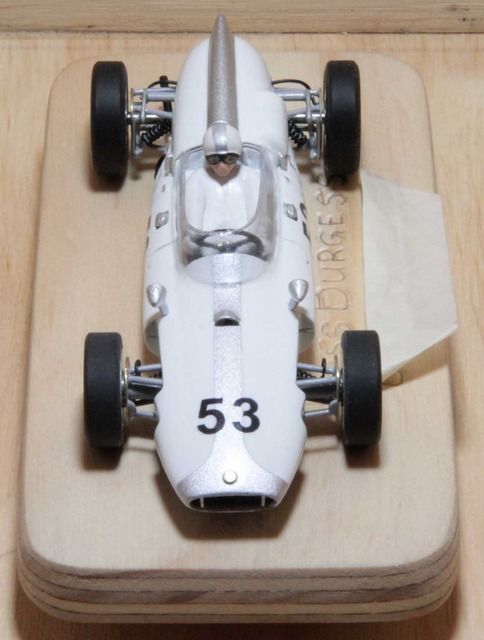 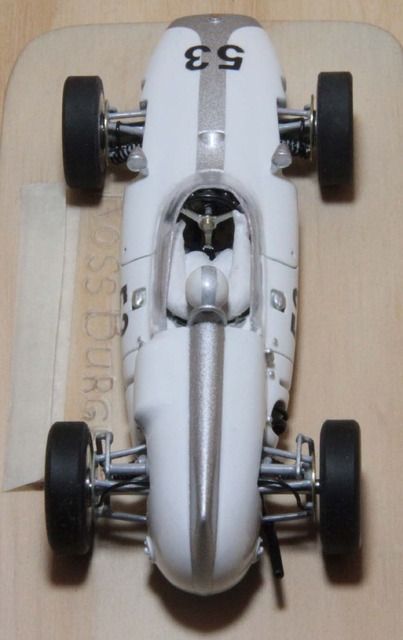 It gets a test run again tomorrow - and if all ok, will be left with the series co-ordinator for the event. Thanks everyone for following the thread and tolerating my dribble..... Build #2 will resume after a short spell to catch up with 3 months domestic in-attention... frats, Rosco |
|
|
|
Post by Ember on Apr 5, 2015 9:05:09 GMT -5
If I've inspired such a build by even a tiny amount I am humbled. So many great builders around here and you pick my ham fisted efforts for inspiration. You have indeed passed those, sir. Dare I suggest a joint build in the future? You can take the hard bits and I'll do the easy driver bits.  |
|
|
|
Post by Chris Wright on Apr 5, 2015 10:58:32 GMT -5
Rosco, A very impressive build! Here's a pix of the real thing. 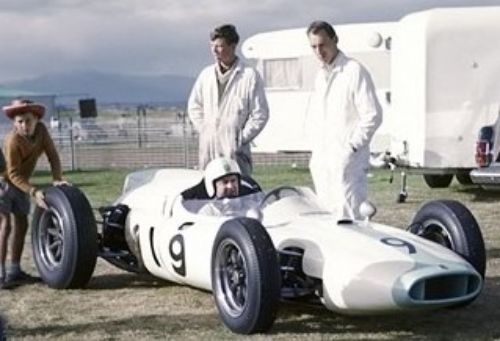 |
|
|
|
Post by rosco01 on Apr 5, 2015 17:13:02 GMT -5
Ember, dear lady - your work, ability and achievements went far beyond what I envisaged I'd be able to accomplish.
I am somewhat disappointed that I could not have done better with the huge amount of time I committed to this build.
Believe me - there are huge flaws in this model... but, I've been pretty much up close and personal with it for some three months.... maybe, must maybe - they aren't so great....
When I set my beady little eyes on your chassis build - I was hooked.... you achieved far more than I believed I could emulate... I would certainly believe that our two little first scratch builts will enjoy each others company on debut... I am very much looking forward to seeing pix of your build as it nears completion... I simply drool over your driver (wipes screen/keyboard yet again - at mere thought).
I have already set a "joint" build in motion - the first piece (like those you get from newsagents here in Oz, where the end model result amounts to enormous expense) will be dispatched shortly.... it's a "universal" piece - so we can discuss a model in a couple of year's time - when there are sufficient pieces to commence a build.
Thanks, Chris - yes, that's the pix I used for reference to livery detail - plus the little driver's vent on the front bonnet.
I have the window in my model far too high - as mentioned, first timer.... I couldn't cut it any lower as it wouldn't have stretched from the rear reveals/plates to the channel between the dash and body....
I now understand that this can be effected by simply cutting away the top of the screen.
I did not do this because it appeared in the vac formed screens I have - that the rounded top was necessary.... oh well, it will get a trim when it comes home.
About to start on build #2 - will keep entries to this forum thread very short, as requested - and lots of pix.
Basic chassis with running gear has already been completed. Body is in two halves for inclusion of carburettor intakes.
Other than that - we go back into a full build again.
frats,
Rosco
|
|
Deleted
Deleted Member
Posts: 0
|
Post by Deleted on Jan 3, 2016 9:41:54 GMT -5
Can we get this solder thing clear, maybe?
Silver solder is actually hard solder, a kind of brazing, requiring heat of between 640-760 degrees from a flame.
Ordinary soft solder can have tiny amounts of silver in it and the lead free version usually does, but it's essentially soldering iron meltable, silver COLOURED, ordinary solder, melting at a much lower point.
If you silver soldered your chassis using a hot flame, your brass would be reduced to rubber almost, since you'd be annealing it and your piano wire would be losing its springiness.
Cheers,
Martin
|
|
|
|
Post by rosco01 on Jan 3, 2016 16:15:43 GMT -5
Thanks Martin, long time since anyone posted in this thread. My reference to "silver" solder is only by what is on the label. It, perhaps may have a percentage of actual silver in it - which sadly I cannot state here because the label is damaged.... I purchased it many years ago from a major hardware chain when I was modeling scratch built brass and white metal locomotives. The white metal soldered joints were done with the lowest melt point solder available - bismuth. The metal running gear required much greater strength and I found this stuff - it is supposedly useful for creating bearings. I use it extensively for r/c model aircraft - when binding tinned wire to piano wire for undercarriages etc..... I do know, and can adamantly state here - that this particular solder is extremely suitable for the brass and piano wire chassis which form the basis for many scratch built models in this forum. I will chase down the product when next I visit the store - and will post up here what the content and melt point is when I find it.... I believe it was written on the package card. Oh, forgot - and it was manufactured in the USA... Just an update on how the little Cooper ran in last year's Tasman proxy - from the field of 24, it came in 6th. Best result was a 4th. I was fortuitously awarded a trophy for "best first time entrant" - a magnificent immense miniatures head of Graham Hill, incredibly hand detailed by Ember... 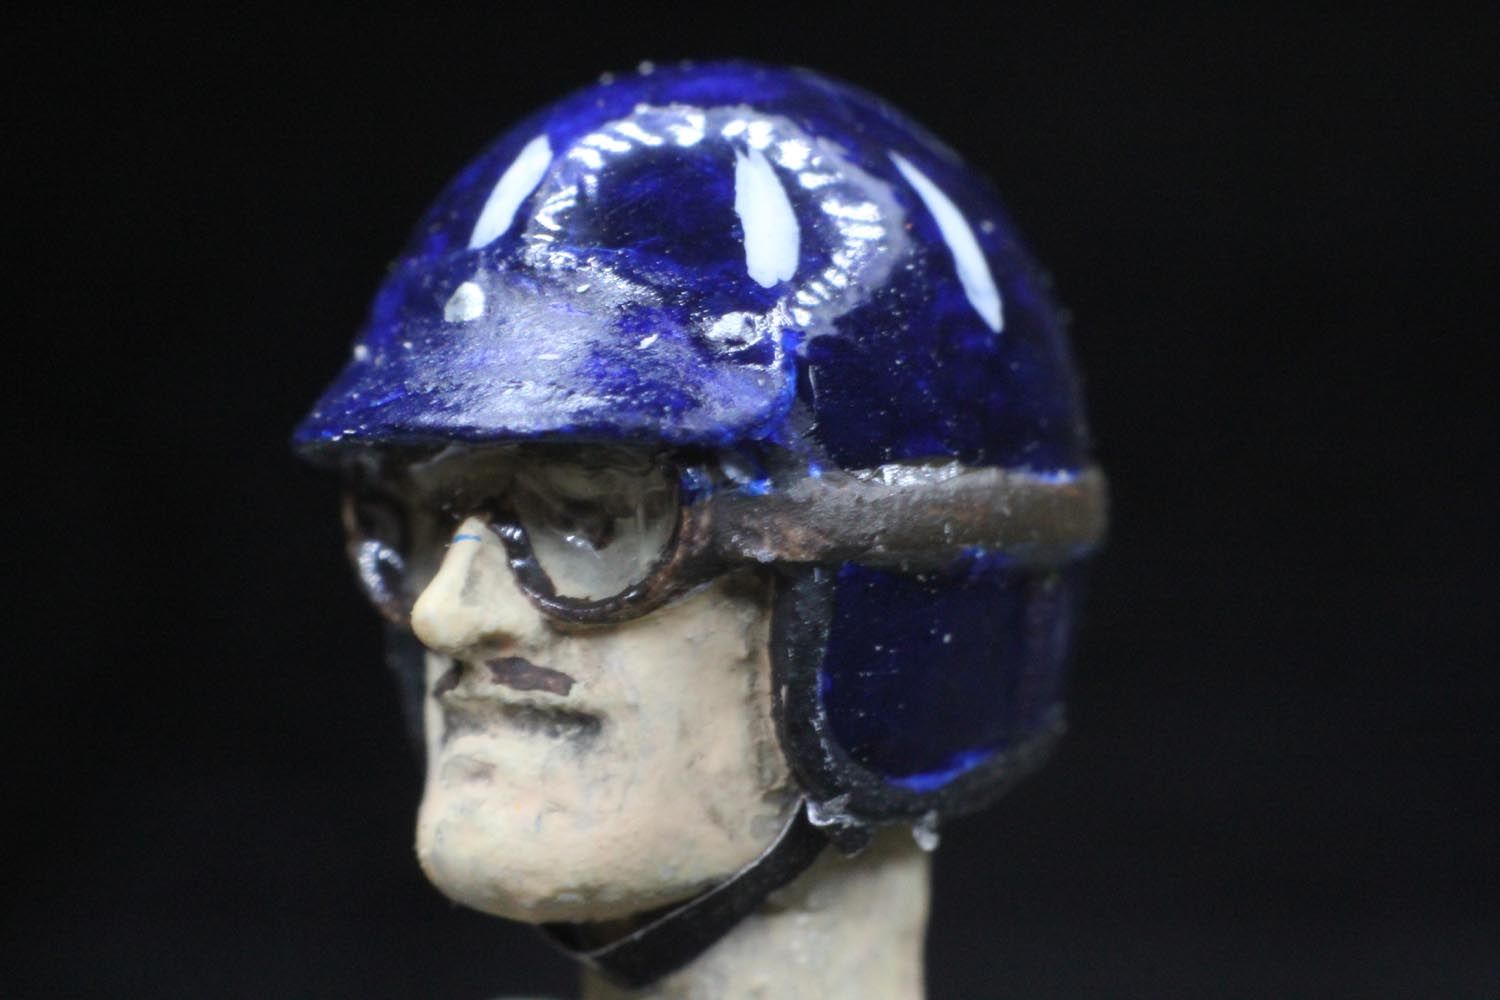 I have entered this year's Tasman proxy series - so far, work has not continued on build #2... if I fail to complete the second of these amazing little cars - "Bill" will get another run in the series in #53.. frats, Rosco |
|
Deleted
Deleted Member
Posts: 0
|
Post by Deleted on Jan 10, 2016 6:53:06 GMT -5
Yep, there are many different grades of soft solder, which is probably the safest term for it.
From low melt point, used by the white metal kit boys to Tinmans', as used by plumbers to wipe a pipe joint with a half pint blow lamp and a tallow pad (watched my Dad do exactly that). I often use a small blowlamp to do soft soldered joints because it saves pressing brass, etc. with an iron for ages, but it's still ordinary iron melting solder.
I use liquid flux (Baker's Fluid) for soldering steel and brass and paste flux (Superflux) for brass/brass or nickel silver. I prefer nickel silver as it is stronger than brass and I think better looking. Solders SO much better too. I've used thin N/S sheet to make up monocoque type structures. Immensely strong and light.
Cheers,
Martin
|
|


