1939 Maserati 4CL - Coppa "Principessa die Piemonte"
Jun 1, 2022 5:58:53 GMT -5
Chris Wright, f143, and 1 more like this
Post by Taffy on Jun 1, 2022 5:58:53 GMT -5
This is a report in several parts about my second car for the "PreWar" class of our small racing series "Vintage 32 Days". My recently shown Alfa "Bimotore" turned out to be uncompetitive due to its overweight. Unfortunately. But its weight cannot be reduced any further, so I had to build quickly a new car five days before the start of the season.
From a collective order at the end of last year from John Warren, I had a suitable Maserati 4cl body for this racing class.
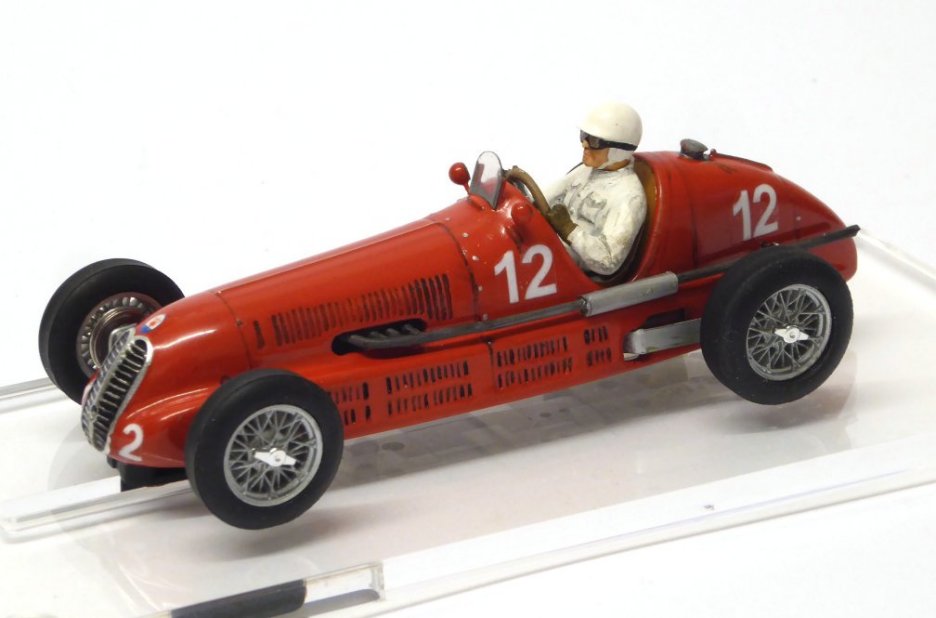
The 4cl was developed by Maserati in 1939 for the "Voiturette" class, in which it was allowed to tussle with the Alfa Romeo 158 and the various ERA types. In the short time it was used until the outbreak of the Second World War, it was able to achieve a few victories, after the war it was further developed into the 4clt and became a car that was particularly popular with many private drivers. The 1500 ccm engine developed 210 hp and required a special mixture of methanol, premium petrol, acetone and oil for this performance. He treated himself to about 80 liters of this delicious drop over 100 km. The English driver Johnnie Wakefield was the first to win the Maserati 4cl at the Coppa “Principessa di Piemonte” in Napoli on May 28, 1939.
Following this LINK you can find a photo of Wakefield´s victory.
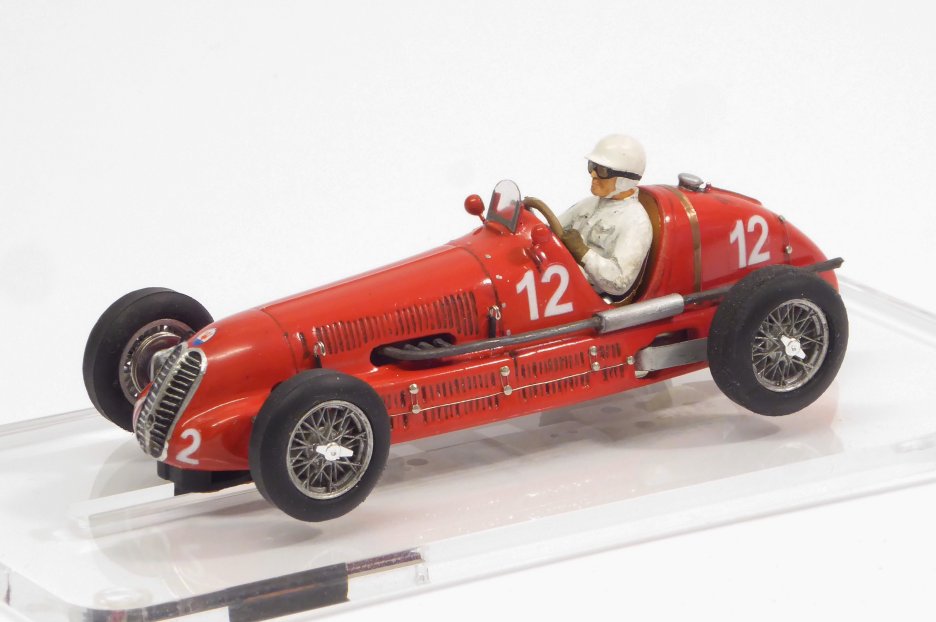
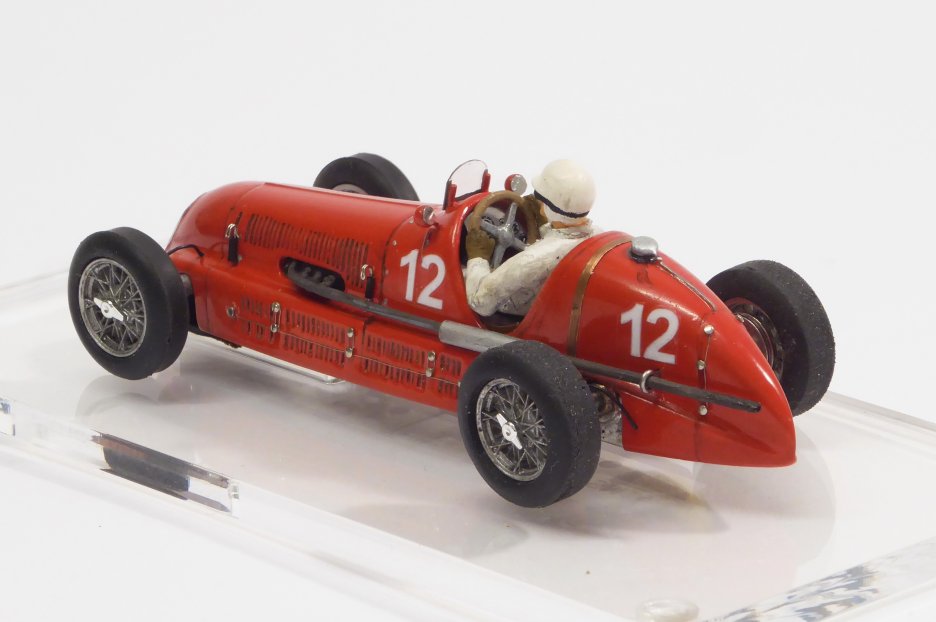
In addition to the very well formed body, the body kit by John Warren contains the resin exhaust system, a multi-part driver figure with separate head, the four-spoke steering wheel and resin mounting brackets. As with the other kits that I ordered from John, the body is made of a resin material that looks robust but not too thick, the details are well presented, the fuel tank cap and a fuel line are cast behind the cockpit, the openings in the hood and sides of the body are indicated, but not completely even. The radiator grille is cast in and minimally asymmetrical.
On the whole, however, the body is very convincing, the proportions are clearly reproduced.
Unfortunately, this also means that the body is very narrow at the back, true to the original, so that I had to do some magic when fitting the Penelope Pitlane chassis (SM1s).
Unfortunately, the time pressure meant that I didn't take a photo of the body kit. I only came up with the idea of taking photos when I had already made quite a lot of progress...
The advantage of the Sm1s chassis from PP is that it is relatively short behind the rear axle mount, so that it fitted underneath with a lot of grinding out of the body. Actually, it is only specified up to a wheelbase of 75mm, for the model-specific 78mm I had to rework the anterior parts of the PP-chassis. But in the end it worked.
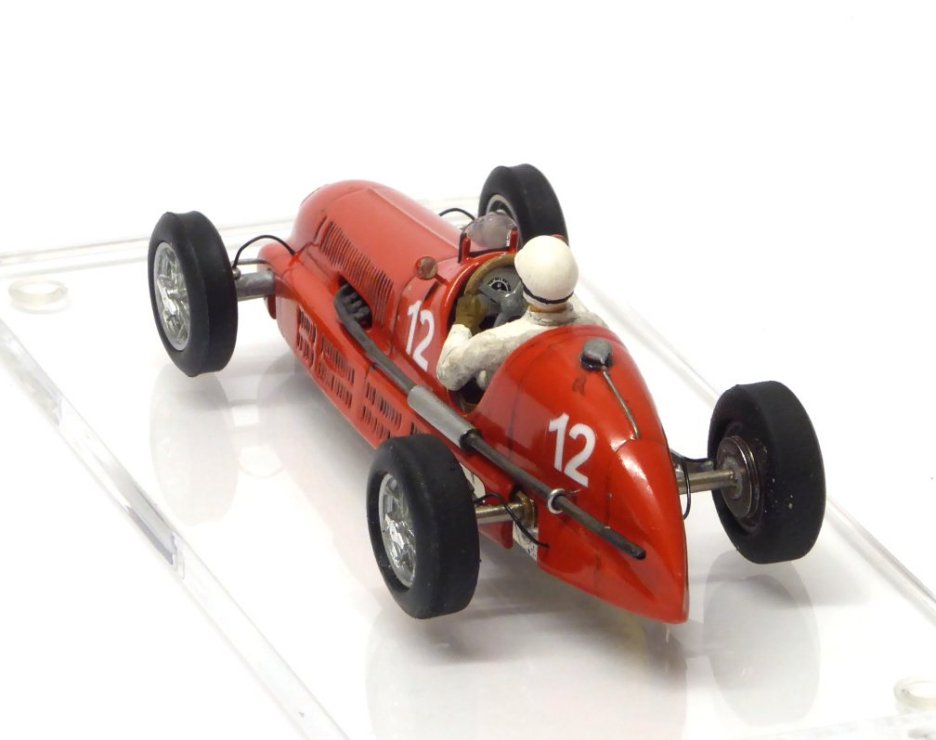
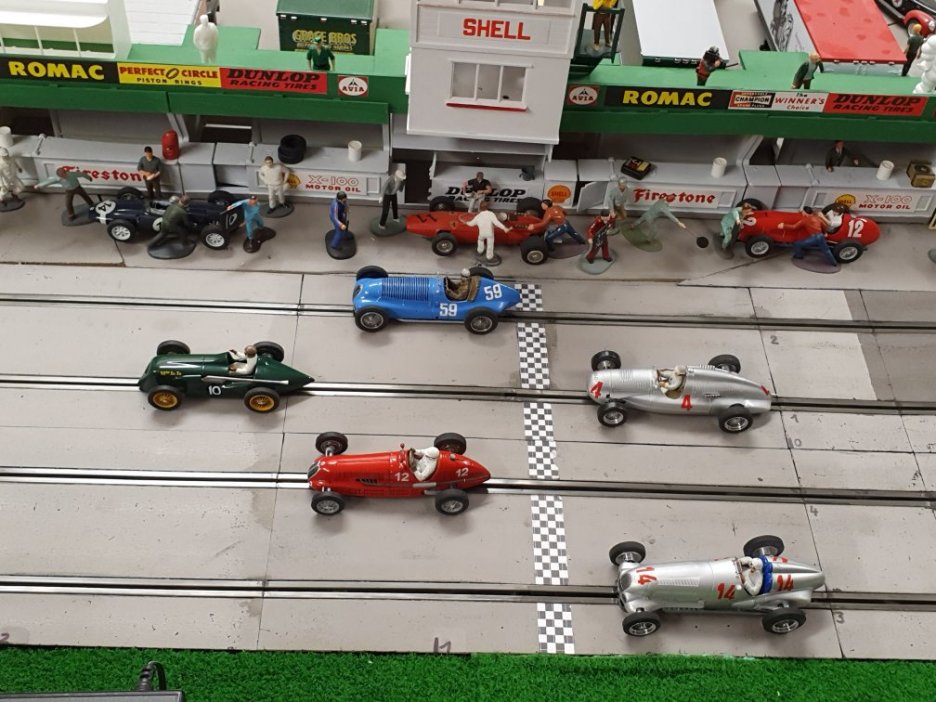
The first photos already show the painted body on the ready-to-drive chassis. Since I've already written about the PP chassis several times here, I'll spare myself that in this report and essentially only go into the details of the bodywork.
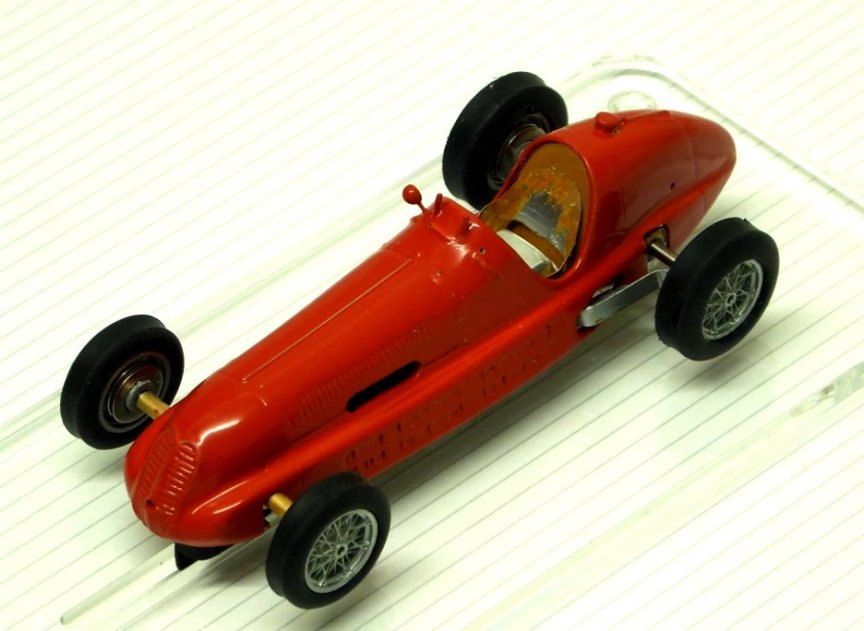
The plastic spoked wheels come from Cartrix, I dechromed them with oven cleaner, which makes them look much more delicate and then, after thorough cleaning, painted them with rim silver. To simulate the brake drums, I glued two washers to the wheel hub stub with superglue. The wheels themselves are also glued to the axle, which is notched at the ends, with superglue. I'm not mean to plastic wheels either, the only downside is that changing the gear ratio isn't as easy as it is with bolted wheels. The concentricity of the Cartrix wheels, on the other hand, is quite acceptable, they are impressive in terms of their appearance and, as you will see later, their function too.
The details you can see in this stage are:
- Rearview mirror made from a pin with a plastic head
- windscreen holder made of 0.8mm wire, glued into the corresponding holes
- Cockpit rear wall made of 0.5mm polystyrene sheet
- Tealight aluminum driver's seat
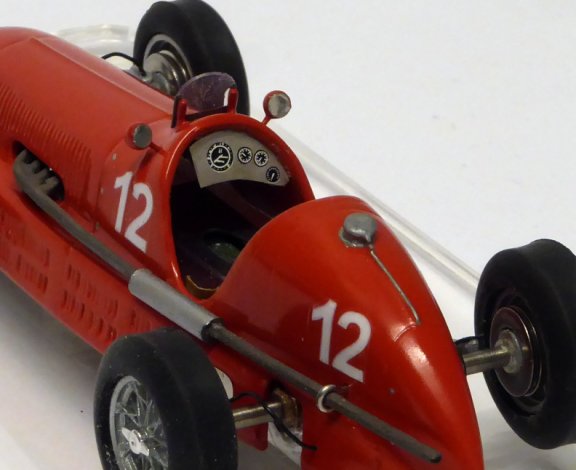
Since the body is cut very far down in the cockpit area, you need a driver's seat to optically cover the engine. You can see it better in the following photo:
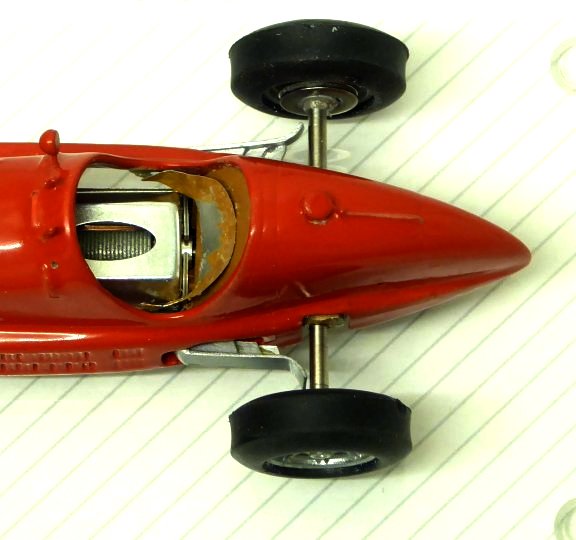
Also good to see here is the simulation of the rear suspension, which is made from the same thin polystyrene material as the cockpit back panel. Cut into thin strips and glued with superglue.
A third detailed photo shows the (asymmetrical in this type) dashboard, also made of aluminum tea light and the windscreen, the rear-view mirrors, which were upgraded with a mirror cut out of mirror foil with punch pliers, and the exhaust. The heat protection in the area below the cockpit consists of a piece of plastic that comes from an empty ballpoint pen refill.
Further detailing in the form of a perforation had to be omitted due to lack of time.
The rear exhaust bracket is again bent from 0.8mm wire. The decals are self-printed with a color laser printer using a white color cartridge from GHOST.
From a collective order at the end of last year from John Warren, I had a suitable Maserati 4cl body for this racing class.
The 4cl was developed by Maserati in 1939 for the "Voiturette" class, in which it was allowed to tussle with the Alfa Romeo 158 and the various ERA types. In the short time it was used until the outbreak of the Second World War, it was able to achieve a few victories, after the war it was further developed into the 4clt and became a car that was particularly popular with many private drivers. The 1500 ccm engine developed 210 hp and required a special mixture of methanol, premium petrol, acetone and oil for this performance. He treated himself to about 80 liters of this delicious drop over 100 km. The English driver Johnnie Wakefield was the first to win the Maserati 4cl at the Coppa “Principessa di Piemonte” in Napoli on May 28, 1939.
Following this LINK you can find a photo of Wakefield´s victory.
In addition to the very well formed body, the body kit by John Warren contains the resin exhaust system, a multi-part driver figure with separate head, the four-spoke steering wheel and resin mounting brackets. As with the other kits that I ordered from John, the body is made of a resin material that looks robust but not too thick, the details are well presented, the fuel tank cap and a fuel line are cast behind the cockpit, the openings in the hood and sides of the body are indicated, but not completely even. The radiator grille is cast in and minimally asymmetrical.
On the whole, however, the body is very convincing, the proportions are clearly reproduced.
Unfortunately, this also means that the body is very narrow at the back, true to the original, so that I had to do some magic when fitting the Penelope Pitlane chassis (SM1s).
Unfortunately, the time pressure meant that I didn't take a photo of the body kit. I only came up with the idea of taking photos when I had already made quite a lot of progress...
The advantage of the Sm1s chassis from PP is that it is relatively short behind the rear axle mount, so that it fitted underneath with a lot of grinding out of the body. Actually, it is only specified up to a wheelbase of 75mm, for the model-specific 78mm I had to rework the anterior parts of the PP-chassis. But in the end it worked.
The first photos already show the painted body on the ready-to-drive chassis. Since I've already written about the PP chassis several times here, I'll spare myself that in this report and essentially only go into the details of the bodywork.
The plastic spoked wheels come from Cartrix, I dechromed them with oven cleaner, which makes them look much more delicate and then, after thorough cleaning, painted them with rim silver. To simulate the brake drums, I glued two washers to the wheel hub stub with superglue. The wheels themselves are also glued to the axle, which is notched at the ends, with superglue. I'm not mean to plastic wheels either, the only downside is that changing the gear ratio isn't as easy as it is with bolted wheels. The concentricity of the Cartrix wheels, on the other hand, is quite acceptable, they are impressive in terms of their appearance and, as you will see later, their function too.
The details you can see in this stage are:
- Rearview mirror made from a pin with a plastic head
- windscreen holder made of 0.8mm wire, glued into the corresponding holes
- Cockpit rear wall made of 0.5mm polystyrene sheet
- Tealight aluminum driver's seat
Since the body is cut very far down in the cockpit area, you need a driver's seat to optically cover the engine. You can see it better in the following photo:
Also good to see here is the simulation of the rear suspension, which is made from the same thin polystyrene material as the cockpit back panel. Cut into thin strips and glued with superglue.
A third detailed photo shows the (asymmetrical in this type) dashboard, also made of aluminum tea light and the windscreen, the rear-view mirrors, which were upgraded with a mirror cut out of mirror foil with punch pliers, and the exhaust. The heat protection in the area below the cockpit consists of a piece of plastic that comes from an empty ballpoint pen refill.
Further detailing in the form of a perforation had to be omitted due to lack of time.
The rear exhaust bracket is again bent from 0.8mm wire. The decals are self-printed with a color laser printer using a white color cartridge from GHOST.
 Taffy
Taffy