|
|
Post by f143 on Oct 16, 2013 4:48:57 GMT -5
As I only drive around my own track, rather than race at a club or other venues, I was wondering on what peoples thoughts were about what makes a "good" chassis.
Also do the different tracks surfaces have any considerable effect on handling?
I welcome your thoughts.
Thanks
Nigel
|
|
|
|
Post by Mark Huber on Oct 16, 2013 8:51:34 GMT -5
Nigel, Having noted that Taffy has again blasted out to a nice lead in our current F1 Proxy series, I could answer your question by saying, "Penelope Pitlane makes a good handling chassis".  I am being only slightly facetious. There is certainly room for error in those PP brass chassis to make a truly awful handling car. So as it applies to little F1 cars only (but then I’ve never built any other type), here are some of my observations from having built some really bad chassis, some okay chassis and seen some absolutely great chassis that put mine to shame. 1) Alignment and balance are key. The car must be perfectly aligned. I know that sounds simple, but believe me I have built cars that didn’t roll straight when I tested them with push on a flat surface. I personally believe all four wheels/tires should touch the surface evenly. 3 out of 4 is really bad. Having the front two wheels floating above the track surface has been a disaster for me, although some folks swear that the ‘sled’ approach is better. 2) Minimize friction. Your motor should do the braking not the parts on your chassis. Wheels must not rub on uprights or trailing arms or the chassis. The axles should spin smoothly and freely in the bearings or inside the axle tubes. A lot of folks state that independently spinning front wheels are better than a solid front axle where both front wheels spin together. From what I’ve seen that would be preferable. 3) I have no advice on weight distribution or chassis flexibility versus stiffness. I don’t think there is a OR formula to come up with either. If there were such a formula, Ecurie Martini would have found it by now. But then perhaps he has and is keeping it a secret. Optimum Weight distribution and flexibility/stiffness are going to vary based on the size of the car, the motor, the track, and the grip. See point 4. 4) So, while you need to do 1 and 2 and tinker with 3, it will be all for naught if you have tires that aren’t trued and/or with mediocre or worse grip. In real estate it’s location, location, location. In scratch building its tires, tires, tires (or tyres, tyres, tyres if you prefer). I’m not going to comment on track surfaces as that topic is above my pay grade, but I will share that if it were up to Chris Wright, Carrera tracks would be consigned to Dante’s Ninth Circle of Hell. Which reminds me, I think the next round of the GPd2013 is on a Carrera track.  |
|
|
|
Post by Taffy on Oct 17, 2013 1:46:37 GMT -5
Mark,
I agree with your main points and would like to add another one: stability.
To build chassis for my formula cars, I prefer to get it as stable as possible. There should not be any winding in the chassis, and if possible, it should be stable even in inpacts.
(For me, as a almost horrible driver, the last point is really important)
I prefer the PP chassis, because they are easy to build. But to make them race-ready for a competition, I stabilize the folding lines by welding, and I add welded struts.
The biggest disadvantage (in my eyes) of the PP-chassis concerning the model requirements is its motor-position, that makes it difficult to use a complete drivers figure. But on the other hand, this gives (in my eyes, again) a good balance to the chassis as an advantage in racing.
The other main important point, that you have figured out, too, is to reduce friction. I don´t like tubes for the front axle, because even, if well lubricated, they give too much friction. I use ball bearings at he rear, welded with the axle in both bearings for a proper alignment, and well lubricated afterwards. If I use brass bearings, I wear them out and polish them inside, until the axle runs free.
I agree with you, too, that the car should stand on all four wheels to avoid tipping and deslotting in curves. For the same reason, I try to use guideflags, which are as deep as possible in the slot. The faster in curves, the faster on straights!
Taffy
|
|
|
|
Post by chrisguyw on Oct 17, 2013 15:32:03 GMT -5
Hello Folks, The tips/techniques given in the previous posts are all valuable and valid, but there are couple that I would like to add.
Firstly, there are several popular set up techniques that stem from 1/24 "commercial" type cars, and from cars that use traction magnets for handling purposes, and as they are all "slotcars", it is often thought that they are transferrable, some are, some are not.
I will focus on the chassis for the cars that most of us are interested in building.....small dimension chassis, with low powered motors, and "hard" tires/tyres. (Hard relative to sponge, and the setup differences are considerable).
Considering the parameters of our cars, and the rules we must adhere to, I firmly believe that chassis execution, as opposed to chassis design is key. I have seen several chassis' in the shop that although employing a "high tech" design, have not been executed well and just don't handle. Conversely, I have seen many a simple chassis (well built) that has handled just great.
1/Building a "square" chassis......
As previously mentioned, this is an absolute must. Try to use a jig (and some set up wheels/blocks) whenever possible. It is critical to ensure that the axles are, parallel, and equally critical, on the same horizontal plane (they obviously do not need to vertically equal, but must be horizontal). Axles that are not parallel will tend to drive the guide into either the left or right hand of the slot, and will also create unbalanced handling in corners. Axles not on a horizontal plane will make front end set up difficult...one tire on the ground, one not.
Try to ensure that your chassis pieces (frame rails etc.) are the best fit you can achieve, if you have to flex a piece with you fingers to make it fit while soldering, the memory in piano wire will make it want to flex back.
2/ Rear end......
One of the most important elements of a good handling, and consistent chassis, is the stiffness of the "triangle" formed by the pinion and the 2 rear bushings. This must be STIFF...... the "plastic" chassis guys commonly complain of hop and chatter, all caused by excessive flex in this area. Flex in this "triangle" does 3 bad things...1/ It results in inconsistent gear mesh, 2/ It causes chatter/hop, and 3/ If the bushings can flex independantly, the axle can/will bind.......none of these are good things.
For those thinking of building a "flexi" chassis, the above still absolutely applies, but, you will be building a chassis that allows this stiff "triangle" to rotate torsionally.
3/ Guide Stuff.........
A short guide lead (distance from the centerline of the rear axle to the guide) results in a car that will transition from right to left very quickly (good for tight twisty tracks) while a longer lead will be smoother on longer radius corners and will have less tendency to tip. (On every 1/32 scratchbuilt F1 car I have, I have found it beneficial to make this lead length as long as the body will permit).
The guide should be parallel to the track surface, and if you race primarily on plastic tracks, it does not hurt if the front of the guide is a few thou. higher than the back. (This will allow the front of the guide to ride just above any irregularities in the plastic track joints, and give you a smoother ride.
The guide should only rotate right to left, if the guide can tilt (rock) from front to back, it can cause arching issues, but with the low power motors you/we use it is not really much of an issue. Much more serious is a guide that can tilt (rock) from right to left.....if this is excessive, as the car corners the guide will tilt, and the blade will meet the slot wall at an angle.....this angle forms a nice little ramp, and the car is more susceptible to front end deslots. Try to keep the guide blade parallel to the slot wall. You can use a piece of brass tubing (same id. as the guide post od.) and make it as long as the guide post/nose of the car will allow.
4/ The "Tripod" !!!!!.....
This set up technique originated in "commercial" track racing, cars with considerably wider tracks than our cars, and more importantly on cars with soft sponge tires......as the cars corner, the outside rear tire compresses, and allows both rear tires to remain in contact with the track. Similarly, cars with magnets, often with more than 200gms. of downforce, never lift a rear tire...if they do, they are gone, so, both can benefit from a tripod set up, magnet cars from a reduction in front end friction, and sponge tired cars as it allows the outside rear tire to compress progressively, resulting in a predictable handling car.
Unfortunately......our little cars, do not have magnets (hopefully), are narrow, and run on "hard" tires......tippy little buggers.....this then requires us to use the front tires to act as outriggers to keep both the rear tires planted on the track. When you have finished your rolling chassis (motor, guide, braid, wheels/tires) place it on a flat block, and lightly press down on each of the front tires.....if the opposite rear tire lifts, you may have some adjusting to do. Taller front tires, removing a guide spacer, thinner braid are all possible solutions. If when pressing on the front tires, the opposite rear tire does not lift you may want to try adding a guide spacer, or smaller front tires to ensure the guide is as far in the slot as possible. The goal is to get the front tires close enough to the track (or touching) so that when doing the "touch test" the opposite rear does not lift, while having as much of the guide buried in the slot as possible.(A stiff chassis will generally require the front tires to firmly touch, while a chassis with some torsional flex will permit the front tires to be a hair off the track and still achieve the same result).
This is where the "flexiboard" demonstrates some of its advantages.......but for now my two typing fingers are getting sore.
I hope some of this helps, and I hope not to have bored the folks that knew this already.
Happy building!!
Cheers
Chris Walker
|
|
|
|
Post by f143 on Oct 17, 2013 20:22:28 GMT -5
Thank you for that information from Mark, Taffy and Chris. I have read some of it before, but I knew these little cars that we race/drive are in their own niche so it is particularly helpful to hear from people who have the experience of racing and developing a chassis that handles properly. Now all I have to do is to translate the theory into a Taffy beating machine (again ), (in the nicest possible way that is) Best wishes for the next race. Regards Nigel |
|
|
|
Post by Mark Huber on Oct 18, 2013 9:36:00 GMT -5
[quote author=" Taffy" source="/post/2761/thread" timestamp="1381992397" I prefer the PP chassis, because they are easy to build. But to make them race-ready for a competition, I stabilize the folding lines by welding, and I add welded struts. Taffy[/quote] Taffy, Please send photos of how you weld a chassis. I know you like a stable chassis, but don't you think welding is a bit overkill? Also, please send me the name of your supplier of your secret compound French tires. I think I need some of those for next year. Very best regards, |
|
|
|
Post by David Lawson on Oct 18, 2013 12:38:05 GMT -5
I can't add anything to the excellent advice above. I work without a jig but build on a perfectly flat surface and keep everything square by taping the rails to the surface and I solder with a torch so the work is never moved by a soldering iron tip. My simple chassis have evolved to work quite well at the Wolverhampton and Southend tracks learning what weight and position of ballast/rattle plates works. 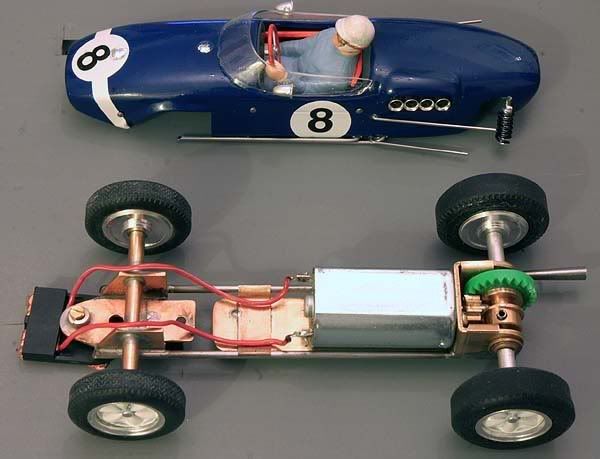 This very simple chassis with skinny tyres and a "cooking" Scalextric rtr motor went incredibly quickly at an Earlybirds event at Woves a few years back so it doesn't have to be hi-tech to be effective. David |
|
|
|
Post by chrisguyw on Oct 18, 2013 13:05:48 GMT -5
it doesn't have to be hi-tech to be effective. David Bang on David!!......"Great ideas without great execution are a waste of time"......can't remember where I heard this, but it certainly applies. Cheers Chris |
|
|
|
Post by Taffy on Oct 18, 2013 15:31:05 GMT -5
(Mark, I have to apologize for my bad english! What I meant, is soldering, not welding, of course. Stiffening the PP-chassis, that is soldering there, where the folded white metal pieces might bend under load, like at the front axle or at the motorbracket of my last year´s winner. I have made photos for you: 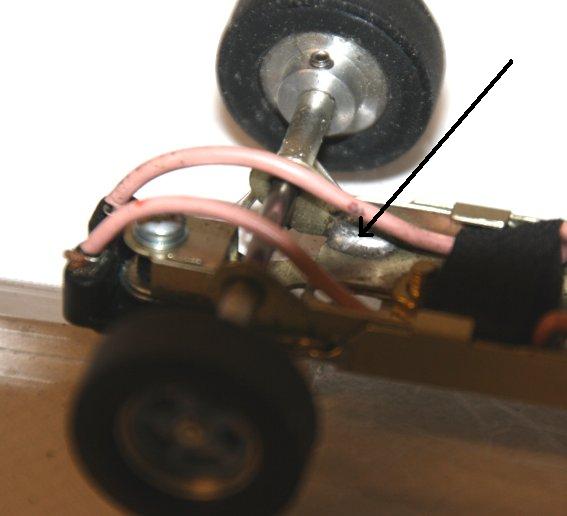 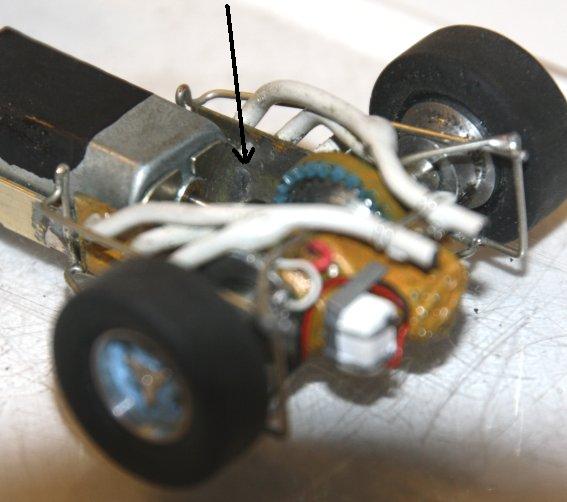 Building my BRM, I added additional transverse soldered struts of white metal, that I cut from the frames of the PP-chassis. There is no secret about the tyres (why do you think,they are french?): I use Ortmann PU-tyres. At the front I have trued them very rough (with 200) to get less grip, at the rear I true them up to 3000 (in these steps: 200/400/800/1200/1500/2000/2500/3000) to get as much grip as possible. With my truing machine, I can do it for both tyres at the same time, so they are more equal. (I do that in similar way to the tyres of my 1:24 formula cars. In my own 1:24-series, it is allowed to seal the front tyres, and there I do it with cyanoacrylate, then they are trued and polished again to reduce the grip.) |
|
|
|
Post by Mark Huber on Oct 18, 2013 16:13:14 GMT -5
Taffy,
Yes, I was quite sure you meant soldered.
Now as to the French tires, now that I think about it, perhaps it was Charles who has the secret French tires. My memory isn't what it used to be or should be!
I am paying the price for not having a tire truer. I had a HUDY once.. it worked for 15 minutes and then died. But that's another story.
|
|
|
|
Post by f143 on Oct 18, 2013 19:41:13 GMT -5
David, could you expand on the rattle plate fitting.
Is it clipped/soldered in place or just a loose fit?
Taffy, the rear suspension detail is particularly well bent in position, is that a skill from your trade?
Thanks
Nigel
|
|
|
|
Post by Taffy on Oct 19, 2013 6:01:23 GMT -5
Nigel,
I would say in reverse, for my trade, these skills are necessary. I started modeling with 12 years (static plastic kits), and in that age, I´d never thought to be an orthodontist (well, I´d never heard of orthodontics). But yes, as an orthodontist, I´m bending wires all day long...
|
|
|
|
Post by David Lawson on Oct 29, 2013 5:19:29 GMT -5
David, could you expand on the rattle plate fitting. Is it clipped/soldered in place or just a loose fit? Thanks Nigel Sorry Nigel I missed your question. I soldered very thin brass strip to the front and rear of the rattle plate then bent it to clip over the chassis rails allowing the plate about 1 or 2mm of vertical movement. It is difficult to spot but the rear clip fits inside the U-bracket and clips over the top of the bracket. David |
|
|
|
Post by Mark Huber on Oct 29, 2013 6:42:41 GMT -5
I can't add anything to the excellent advice above. I work without a jig but build on a perfectly flat surface and keep everything square by taping the rails to the surface and I solder with a torch so the work is never moved by a soldering iron tip. My simple chassis have evolved to work quite well at the Wolverhampton and Southend tracks learning what weight and position of ballast/rattle plates works. This very simple chassis with skinny tyres and a "cooking" Scalextric rtr motor went incredibly quickly at an Earlybirds event at Woves a few years back so it doesn't have to be hi-tech to be effective. David For some of us, well, for me, a rattle plate would be considered Very hi-tech! Goodness, I'm not sure those things should even be 'legal' on these little cars. |
|
|
|
Post by Mark Huber on Oct 29, 2013 10:58:24 GMT -5
I can't add anything to the excellent advice above. I work without a jig but build on a perfectly flat surface and keep everything square by taping the rails to the surface and I solder with a torch so the work is never moved by a soldering iron tip. My simple chassis have evolved to work quite well at the Wolverhampton and Southend tracks learning what weight and position of ballast/rattle plates works. This very simple chassis with skinny tyres and a "cooking" Scalextric rtr motor went incredibly quickly at an Earlybirds event at Woves a few years back so it doesn't have to be hi-tech to be effective. David For some of us, well, for me, a rattle plate would be considered Very hi-tech! Goodness, I'm not sure those things should even be 'legal' on these little cars. Seriously though, I do wonder: For a relatively small car such as these Vintage F1 models with relatively skinny wheels and tires, will a rattle plate make any difference to performance? Are the car's lap times noticeably better then if a solid brass plate/ weight were firmly secured to the bottom of the chassis? I never really raced the BIG cars (just a few months of futile efforts on a commercial track 40+ years ago), but I know that rattle plates/floating pans, were/are the way to go for sophisticated 1/24 racing cars. So, will a rattle plate improve the performance of my 2014 VRAA car or my GPd2014 car? All things being equal of course. |
|


 Taffy
Taffy

